Signing Certificate
Security tokens are issues by the builtin IdentityServer. To secure these tokens, the server needs to generate a digital signature, so that anyone reading the token can verify that the token is a valid, unmodified token issued by the same server. For this purpose the server needs an x.509 certificate. Because the private key is used only by the issuing server, and anyone can retrieve the public key and use it to validate the signature, there is no need for a trust chain. Therefore a self-signed certificate is good enough, it's basically just a public/private key set.
Configuring the signing certificate
The certificate must be installed in Windows Certificate Store under the machine account. The certificate thumbprint must be registered in the api's web.config file using the signingCertificateThumbprint key. If you have a usable certificate already in the store, be careful if using copy/paste to copy the certificate thumbprint because the Certificate Manager has a flaw where it tends to include invisible characters in the clipboard.
<appSettings> <add key="signingCertificateThumbprint" value="A70F15359941A24CB566701E9F2329B9BD75BA46" /></appSettings>
Generating a self-signed certificate
Using Windows Powershell it is quite easy to generate and install a new self-signed certificate. Use this command to generate a certificate that is maked for signature generations and verification (must be run with administrative privileges):
New-SelfSignedCertificate -Subject "WEBSITENAMEGOESHERE" -KeySpec Signature -KeyAlgorithm RSA -KeyLength 2048 -HashAlgorithm SHA256 -CertStoreLocation 'cert:\LocalMachine\My' -NotBefore $(Get-Date) -NotAfter $((Get-Date).AddYears(10))
You can replace the subject with another appropriate common name and you can also adjust the start and ends dates to match you requirements.
This command will automatically generate and install the certificate and private key. It will also print the thumbprint that must be registered in the web.config file as mentioned above.

Private key permission
The Application Pool under which the api is running, must be granted access to the private key of the configured certificate. Permissions are configured in the Certificate Manager mmc addin. This can be started by typing certlm.msc in a command prompt or in the Windows | Run dialog box. The manager must be run with administrative privileges.
In the manager, find the certificate, usually under the Certificates | Personal | Certificates folder.
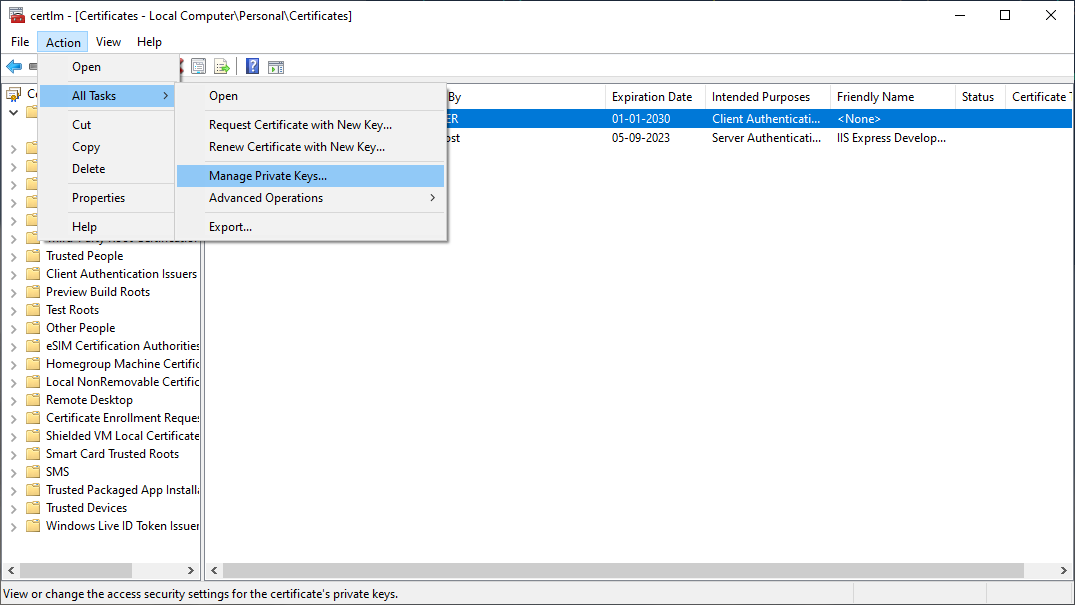
Select the certificate and go to Action | All Tasks | Manage Private Keys...
This will open a permissions dialog like this:
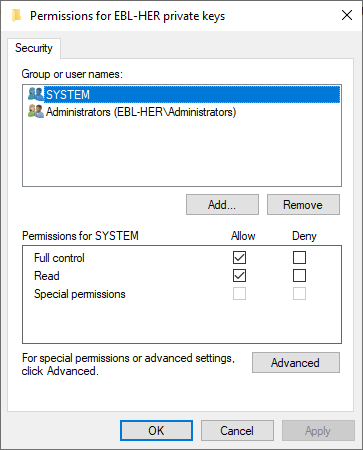
It is necessary to add the identity used to run the Application Pool to this list and grant Full control to the account.
Api Client
Any application that want to call the Link Api must be registered as an Api Client. The client registration specifies a client id and a client secret. These must be included in the client authorization request - depending on the authentication flow used. The client registration also specifies which authorization flow the client uses.
Registering a new client
At present there is no user interface to register api clients and there is no tool either. The registration is stored in the Link database and must be added using T-SQL or similar. A client can be inserted using T-SQL similar to this:
INSERT INTO [WebServices].[tApiClients] ([ClientId] ,[ClientName] ,[Secret] ,[AllowedScopes] ,[AccessTokenLifetime] ,[IdentityTokenLifetime] ,[AuthorizationCodeLifetime] ,[AbsoluteRefreshTokenLifetime] ,[SlidingRefreshTokenLifetime] ,[Flow])VALUES (<ClientId, nvarchar(max),> ,<ClientName, nvarchar(max),> ,<Secret, nvarchar(max),> ,<AllowedScopes, nvarchar(max),> ,<AccessTokenLifetime, int,> ,<IdentityTokenLifetime, int,> ,<AuthorizationCodeLifetime, int,> ,<AbsoluteRefreshTokenLifetime, int,> ,<SlidingRefreshTokenLifetime, int,> ,<Flow, nvarchar(50),>)
where
-
ClientId is a unique string identifying the client
-
ClientName is a descriptive name for the client
-
Secret is a secret text, known only to the api (here) and the client - similar to a password
-
AllowedScope must be a combination of the following case sensitive values, separated only by a comma (,) without any spaceopenid - grants client access to very basic profile infooffline_access - grants client access to a refresh token, which is then included in the reply to the token requestapi - grants client access to the Link api
-
AccessTokenLifetime specifies the lifetime, in seconds, of the access token
-
IdentityTokenLifetime specifies the lifetime, in seconds, of the identity token
-
AuthorizationCodeLifetime specifies the lifetime, in seconds, of the authorization code
-
AbsoluteRefreshTokenLifetime specifies the maximum lifetime of the refresh token (after which a new full authentication is required)
-
SlidingRefreshTokenLifetime specifies how much to prolong the lifetime of the refresh token every time it is used
-
Flow specifies the flow that the client uses. Supported flows are AuthorizationCode (recommended) and ResourceOwner
Link Permissions
Link permissions controls who can access what. More information on Link permissions are available in the Link documentation. For that api, there is a specific permission for each api method. The calling user must have the right permission for each method that will be called. If the user does not have the required permission, an Unauthorized error is returned. It is worth noting the difference between an 'Unauthenticated' error and an 'Unauthorized' error. The first means that no valid authentication is sent with the request, while the latter means that the authentication is valid, but the token does not include the required permissions.
Permissions and roles
Permissions and roles are distributed with Link and installed by default. All permissions and roles names start with 'API '. There are many permissions, one or more for each api method. Permissions are grouped into roles, which are defined for each entity with view and modify roles as appropriate, for example 'API Partner View' and 'API Partner Modify'. Roles and permissions are managed in Link.
Users and user groups
Users and user groups are managed in Link, just as permissions and roles. However, users and user groups are not distributed with Link, these must be created and maintained by the local administrator. By default no user has access to any part of the Link api. It is necessary to create one or more user groups and assign the required roles to the groups, then assign the required user groups to the users accounts that needs access. Users and user groups are managed in Link,
AppSetings
The following application settings are configured for the Link api in the web.config file in the root deployment folder:
<appSettings>
<add key="allowInsecureHttp" value="" />
<add key="tokenIssuer" value="" />
<add key="publicOrigin" value="" />
<add key="signingCertificateThumbprint" value="" />
<add key="secondarySigningCertificateThumbprint" value="" />
</appSettings>
Allow insecure http
Determines if connections over http protocol is accepted by the token endpoint or if the secure https protocol is required. Specify "true" or "false" - false to accept http or true to require https.
Token issuer
Specifies the token issuer, this is embedded in the token and can be inspected by any application processing the token. Defaults value is "https://bizbrains.com".
Public origin
Specifies the exact base url used to access the api. This must be the exact url including protocol, host name and any base folder the is prepended before the api specified folders, for example "https://api.link.bizbrains.com". If this setting is not specified or is incorrect, all authentication will fail, including authentication from the builtin Swagger pages.
Signing certificate thumbprint
See the Signing Certificate section above.
Secondary signing certificate thumbprint
Specifies a secondary signing certificate. Similar to the above setting, but only used for validation purposes. This can be used to transition from one certificate to a new without service interruption.
Content on this page: