This section describes how to let users sign in to Link using Azure AD authentication.
Table of content
Register Link in the Azure AD
Link need to be registered as an Application in the AD.
-
Login to the Azure portal at navigate to the AD
-
Click the App registrations link and add a new registration
-
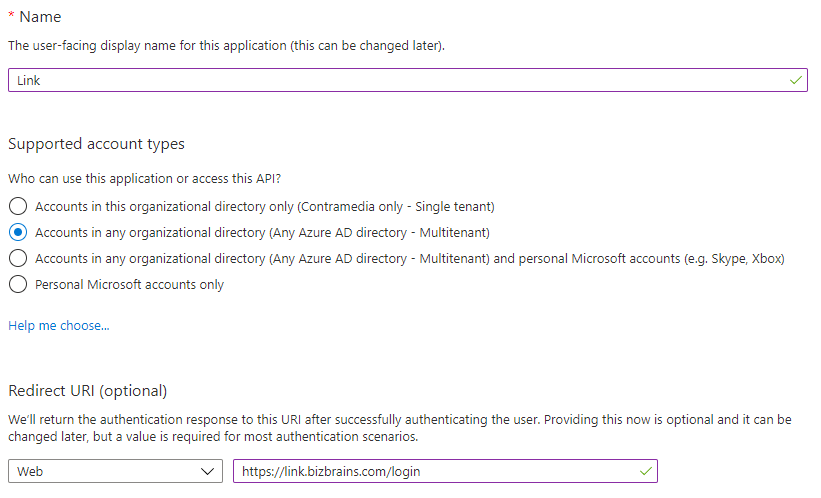
Select Multitenant if you would like to allow access from other AD’s - you can specify which AD’s to allow access in Link later on.
-
Save the app registration and click the Authentication link in the menu.
-
Select Access tokens and click save.
-

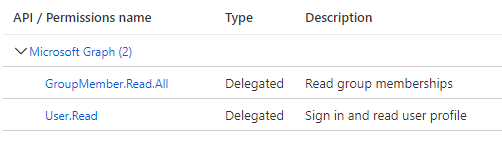
Click the API permissions link in the menu and add the following delegated permissions for the Microsoft Graph API.
-
Finally click the Overview link in the menu and note the Application ID - you will need this in the next section
Additional steps for multitenant applications
If you have choosen to allow multitenant access to the app, Microsoft requires you to specify you MPN ID to verify that you are a trusted publisher.
-
Click the Branding link in the menu.
-
Click Add MPN ID to verify publisher and type the MPN ID in the dialog.

Configure Link to use Azure AD authentication
Enable Azure AD Authentication
-
Open the Link website root folder.
-
Edit ediportal-config.json and set azureADClientId to the ID of the application you created earlier
-
If you created the application as single tenant you have to replace “common” in the azureADLoginUrl with your tenant ID.
{ "azureADClientId": "6014aee9-5bb6-40a2-84cb-6a3af0036ac2", "azureADLoginUrl": "https://login.microsoftonline.com/common/oauth2/v2.0/authorize?prompt=select_account&response_mode=fragment&response_type=token&scope=https://graph.microsoft.com/groupmember.read.all https://graph.microsoft.com/user.read&nonce=abcde" } -
Recycle the IIS application pool.
Setup Link User Groups
When a user logs in to Link for the first time using Azure AD authentication, Link will create a new user and assign one or more user groups. Which groups depends on what AD groups the user is member of. On a link user group it's possible to specify a Domain Account. If a user has an AD group with that name the user group will be assigned to the user.
NOTE: Link will synchronize Azure AD groups every time a user logs on. Any assigned Link-groups, that are not found in Azure AD will be removed from the user.
A users group memberships in Azure AD:

A matching group in Link:

The KA’s needs to ask their customer to create these 3 default Azure AD groups (naming standard is decided by the customer:
1. Admin
2. Editor
3. Viewer
Now the KA has to create groups in Link in the customers dataowner, and then link the domain account to the groups made in Azure AD.
NOTE: If the Azure AD group is synchronized from Windows AD, Domain account name might need to be prefixed with the Domain name eg: DOMAIN\Developers
Specify Azure AD tenants to accept logins from
-
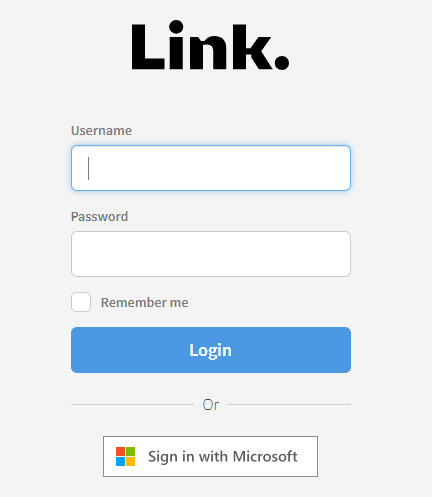
The Link login dialog should now look like this
-
Click Sign in with Microsoft and enter your credentials.
-
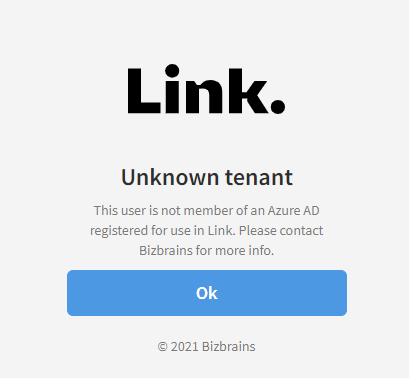
The first time you sign in you will be presented with the following message
-
To allow logins from the tenant edit the table [Users].[tAzureADTenants]. The row has already been created but you need to specify a DataOwnersId and set Approved to true.

-
Now users from the Azure AD tenant can login to Link.