Link Administration
The Link Administration Tool is used for installing databases and some required Biztalk adapters for Link. It is also used to create a variety of entities to use in integrations running on Link. It automatically generates SQL script based on the given inputs, which makes it easy to deploy changes to other environments.
Introduction
It is a user interface tool, to install database, configure the objects in Link. It is divided into following categories based on the functionalities.
-
Install BizTalk adapters
-
Create new dataowner script
-
Create sql jobs
-
SSIS
-
Create scripts for Object Type, Itineraries etc.
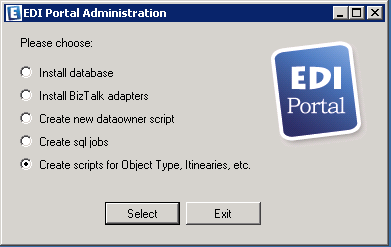
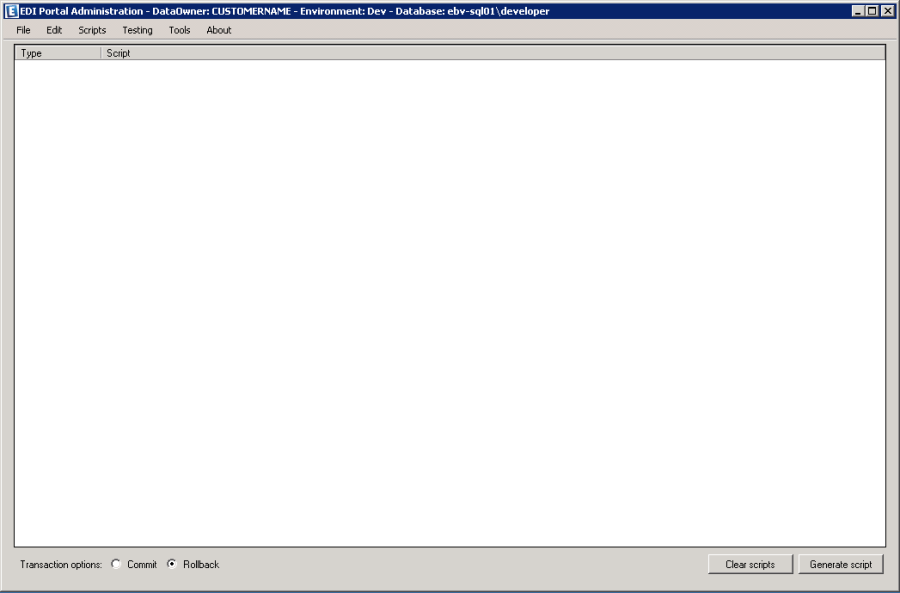
The following figure comes when click on Start> All Programs> Bizbrains> EdiPortal Administration Tool> EdiPortal Administration. Then choose the required functionality.
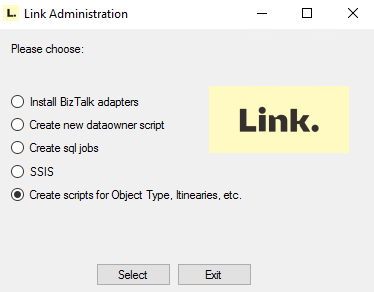
Choose one of the items, press the button 'Select'.
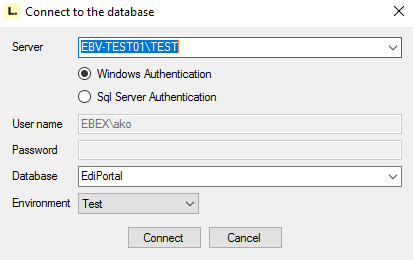
The following interface shows that database connection. It shows that database server, authentication, database and environment.
Install BizTalk adapters
It provides to install required BizTalk adapters on the given install path. This interface is defined as below.

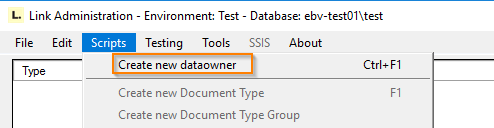
Create new dataowner script
It creates a script for new data owner. It creates all required transport types, document types, default partner, user and identification.
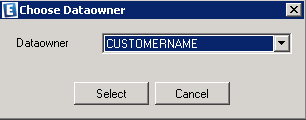
The following figure shows that how to select crate new data owner.
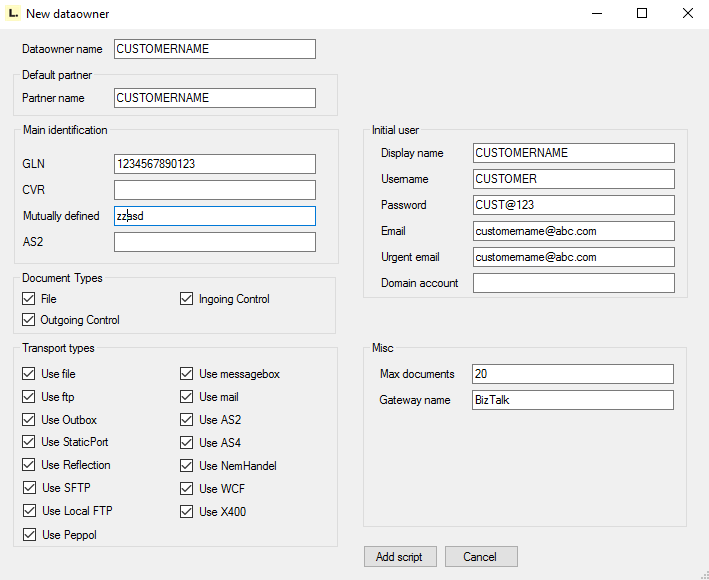
Click on the "Create new dataowner", then new data owner window pops up. The sample data owner, CUSTOMERNAME is defined below. It has Default partner as CUSTOMERNAME, identification as GLN, mutually defined, document types, transport types, user and Miscellaneous.
After filling all required details, then press button 'Add script'. It is going to add in middle panel of the main wizard. Then choose transaction options as 'Rollback' or 'Commit' and press the button 'Generate script' as show below.

Then the new window, 'Generated Script' will pop up. It is shown as below. It contains SQL script, links 'Copy to clipboard' or 'save to file'. If we click on save to file option, pop up with 'Save As' Dialog. Then give the file name and press the button 'Save'. Hence it is created and able to run on SQL database.
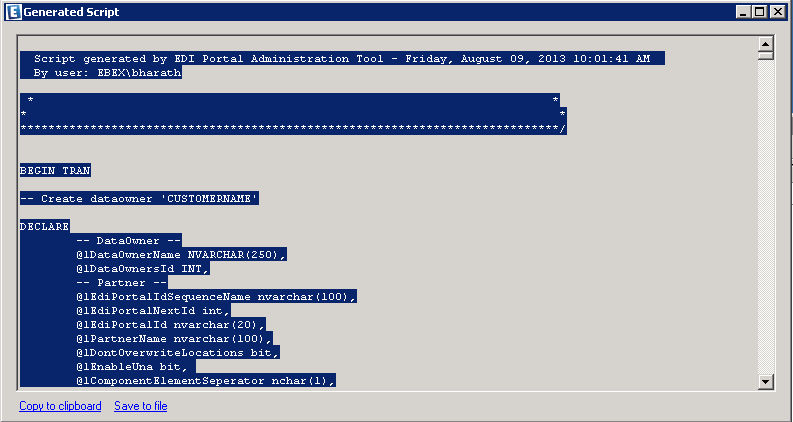
If you have chosen the rollback option, the script generated will be executed in a transaction that will be rolled back at the end. It can be a good habit to do this, to test your script, before committing it to the database. In this scenario you must alter the last line of the script to make the transaction being committed.
<INDSÆT SCREENSHOT>
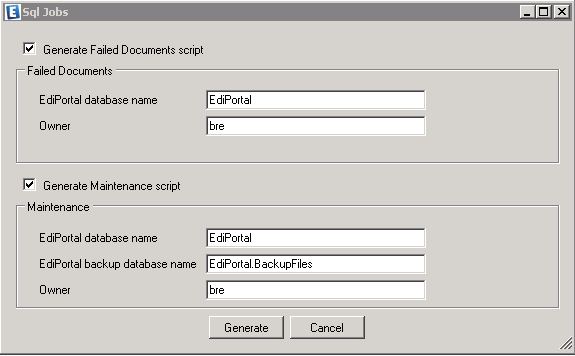
Create SQL jobs
It provides to create sql jobs for find out failed documents in EdiPortal database and maintenance job. The failed documents script shows the documents are in FailProcessingDocuments, FailAwatingControlDocuments, InProcess documents more than 24 hours. The other Maintenance job does delete unused documents and rebuild all indexes. This interface is defined as below.
Link configuration and generating entity creation scripts
Open the Link Administration application. Choose "Create scripts for Object Type, Itineraries etc.", and press the "Select" button.
You now see the main view for editing various setting for the Link environment, as well as generating SQL scripts for the creating of various entities like document types, formats, itineraries etc.
The middle of the view contains an overview of the entity creations that will be added to the script being generated. You can add a sequence of entities through the "Scripts" selection in the top header menu. Once you have added all the entities you need, you can then generate a SQL file, which will contain the logic for creating all the entities you have specified.
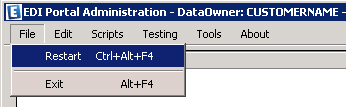
Exiting and re-staring the application
The menu, File contains Restart and Exit sub menus.
-
Exit. It does exit from the application.
-
Restart It does back to first wizard as shown in Fig. 1.
Configurations of the Link environment
Through the menu item "Edit" you are able to make a lot of configurations and tweeks of the Link.
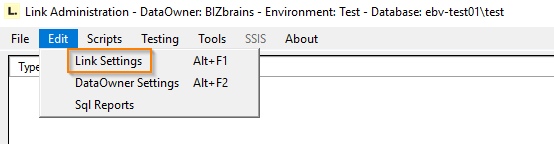
Link Settings
Link Settings contain numerous configuration values that the Link uses. For each key there is value for each possible staging environment of BizTalk and the Link.
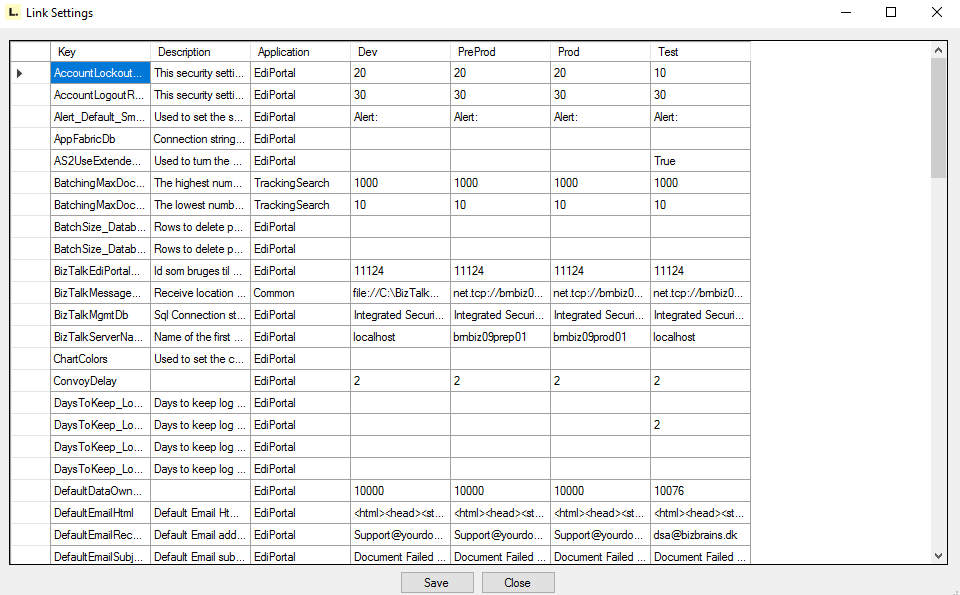
You have the possibility to add new keys and you can get the value programmatically through the Link API.
For example, if you want to get the value of BizTalk setting key, Ebex.EdiPortalDb, call the API like below. string bizTalkKeyValue = Configuratoin.GetConfigurationValue("Ebex.EdiPortalDb");
If you want to create or update the key, then call API like below:
Configuration.CreateorUpdateValue(string key, string value, int environmentTypeId).
Other than that there are quite a lot of keys that the Link is depended upon. Here is list:
|
Link settings Key Name |
Description |
|
AppFabricDb |
Connection string to the AppFabric database |
|
AS2UseExtendedReceiveLogging |
Used to turn the AS2 logging for incoming messages on/off - values must be True/False |
|
BizTalkEdiPortalUsersId |
Id som bruges til at opdatere Tracking med fra BizTalk flow |
|
BizTalkMgmtDb |
Sql Connection string to BizTalkMgmtDb database |
|
BizTalkServerName1 |
Name of the first BizTalk server. Used for resubmit message location |
|
ChartColors |
Used to set the colors of the charts in a comma separated string (eg. #FF4F81BD,#FFC0504D,#FF9BBB59,etc...) |
|
ConvoyDelay |
NULL |
|
DefaultDataOwnersId |
Default Dataowner Id used if Dataowner was not set on port and could not be found by looking in content |
|
DefaultEmailReceiver |
Default Email address for errors in tracking search if no Stakeholder can be found |
|
DefaultEmailSubject |
Default Email subject for errors in tracking search if no dataowner specific error is specified |
|
DefaultUnoaReplaceChar |
Default character to input when faced with an illegal char when creating UNOA documents. |
|
DefaultUnobReplaceChar |
Default character to input when faced with an illegal char when creating UNOB documents. |
|
DefaultUnocReplaceChar |
Default character to input when faced with an illegal char when creating UNOC documents. |
|
DefaultXmlBatchingNamespace |
The xml namespace of the rootnode to be wrapped around the messages being batched |
|
DefaultXmlRootNode |
The name of the rootnode to be wrapped around the messages being batched |
|
Ebex.EdiPortalBackupDb |
Connection String pointing to the EdiPortal.BackupFiles database |
|
Ebex.EdiPortalDb |
Connection String pointing to the EdiPortal database |
|
Ebex.EdiPortalToolsDb |
Connection String pointing to the EdiPortal.Tools database |
|
EdiPortalBackupFilesDbName |
The Sql server database name of the EdiPortal File Backup |
|
EdiPortalDbName |
The Sql server database name of the EdiPortal |
|
EdiPortalExceptionDbName |
Database name of the Exception DB |
|
EdiPortalRcvPipelinePropertyValueSeperator |
Character used to seperate values for properties, which supports multible values, on the Link receive pipeline component. |
|
ErrorHandling_EsbFaultMsgSendPipeline |
Full qualified pipeline name of Esb Pipeline to construct Fault Message Xml |
|
ErrorhandlingLogFolder |
Folder for errors that could not be processed |
|
EsbExceptionDb |
Connection String pointing to the EdiPortal.ExceptionDb database |
|
FtpLogPath |
Root folder of where we store ftp log files. |
|
GlobalDefaultTestLocation |
TransportconfigurationsId used for Test location if no default exist for DataOwner/TransportType |
|
LogDestination |
Accepts enum - FILE or EVENTVIEWER; determining the destination of logging |
|
LogDestinationDetail |
Determines the location of LogDestination |
|
LogEnabled |
To determine whther it have to log additional information for the ongoing processes |
|
LogLevel |
Determines the priority of messages to be logged rating 0 as LogAll and 10 as maximum |
|
LogObject |
Accepts either a distribution_object or ALL for which logging is required |
|
MaxNumberOfMonitorItemStatuses |
The Monitor Cleanup will delete old monitor item statuses in excess of this number |
|
MaxSearchResults |
The max number of searchresults returned |
|
NemHandelConfigFile |
Path to configuration file needed to use transport type NemHandel |
|
PipelineToUseForEdiAssemble |
Pipeline used for EDI assemble |
|
PipelineToUseForValidation |
Pipeline to use for validation in Transform EdiPortal Itinerary |
|
SqlCommandTimeout |
Specify time out for sql command |
|
SqlServerEmailProfile |
The sql server profile used to send Emails directly from the sql server |
|
SSISConnectionString |
Connection string to SSIS db |
|
TrackingSearchUrl |
Default URL for TrackingSearch. Used when sending out Error mails |
|
TransportConvoyDelay |
Specify transport Convoy Delay |
|
UsePriorityQueue |
Determines if prioritized document processing is enabled. This means that documents received will be stored in Link databases at first. Afterwards it will be processed by BizTalk in a prioritized manner. |
|
|
|
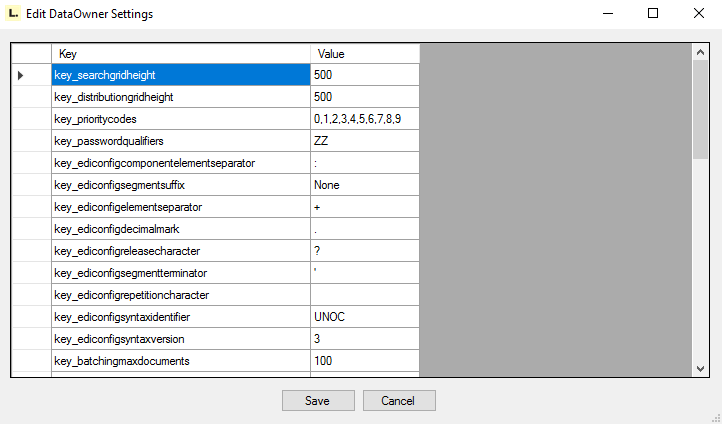
DataOwner Settings
The Data Owner Settings are key/value fields, that you can specify and make use of programmatically like the Link Settings, with some differences. The Data Owner fields are not environment specific, which means that you can't differentiate between Test or Production values for instance. The Data Owner Settings are, as the name implies, related to a Data Owner. So in an environment where you have multiple Data Owners, you will have multiple sets of Data Owner Settings. Most installations will only need one data owner though.
Create new Document Type
It provides to create a new document type based on inputs. It is defined by name, short name, fully qualified Cdm Schema name and other properties. It can be used for distribution and able to set allow caching; allow light tracking and backup settings. The following figure shows that creation of 'Sales Invoice' document type for dataowner, CUSTOMERNAME.
NOTE: Caching of NULL values is not supported and will be ignored.
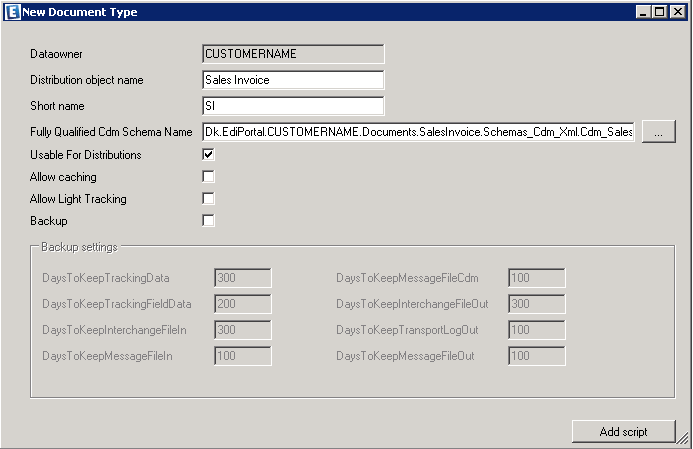
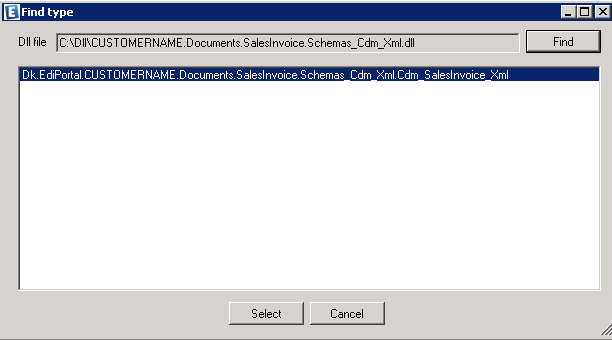
Use the button '…' to fill Fully Qualified Cdm Schema Name. It helps to choose the cdm schema assembly using 'Find' button and it display what are available schemas. And then you can select the required Cdm schema, press the 'Select' button. It's automatically generates fully qualified name.
Create new Itinerary and itinerary Steps
It provides to create new itinerary and itinerary steps for dataOwner. For example, we want to create a new itinerary, Passthrough_Batch. It has three itinerary steps. They are TransformFromCdm, TransformToCdm and Batch. Use arrow buttons, ^ ˅ to give the execution order in itinerary steps (Number 1 starts from top). The following figure shows that PassThrough_Batch iternary.
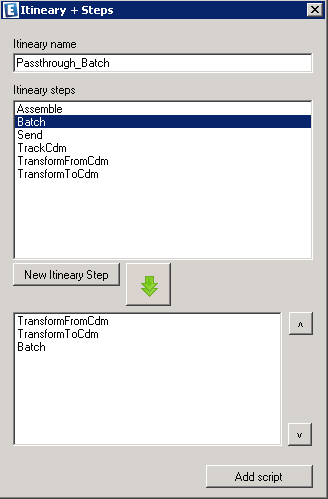
Press Add script button, the new SQL scripts are going to be add in middle panel of the main window.
Create new Configuration Key
It provides to create a new configuration key based on distribution or partner. This can be created for the following cases.
-
Distribution_DistributionObject:
-
Distribution_DocumentConfig
-
Distribution_FormatType
-
Distribution_General
-
Distribution_Partner
-
Patner_General
-
Partner_Specific
For example, if we have multiple identifications either GLN or AccountNumber of a Buyer for a distribution, Sales Invoice. Then we can able to create configuration key as checkbox, AccountNumber as Buyer. The following figure shows that it.
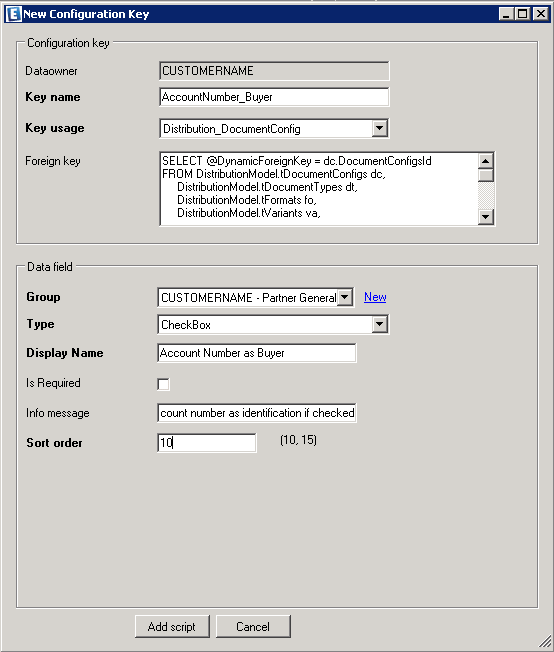
The new data field has to create for configuration key. We can define data type as the following.
-
CheckBox
-
DropDown
-
Password
-
File
-
Label
-
Password
-
Textbox
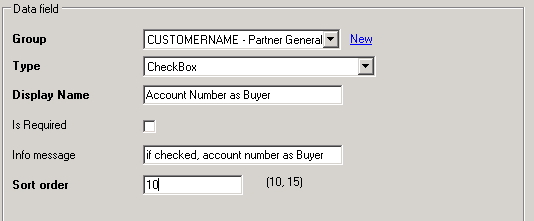
Based on the data field, it is automatically populate the required properties. If we choose as CheckBox, then it looks like as below.
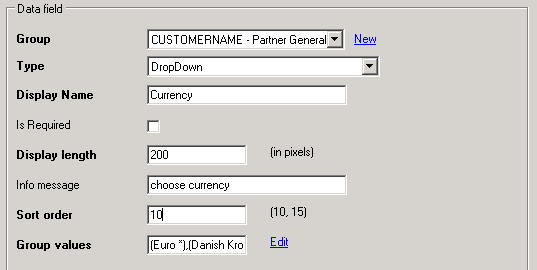
If we want to define set of values for a datatye, then choose as DropDown type. It is defined as below.
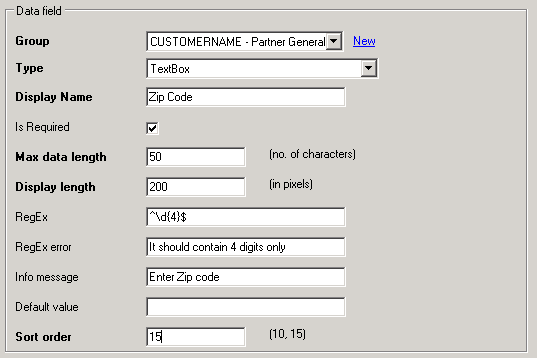
If we want to define Textbox, then it look likes as below. We can define validation rule using RegEx property, specify maximum data length, info message means that description when mouse occurs on it.
If we want to define a Password data type, it is same as text box expect it shows **** when user enters data.
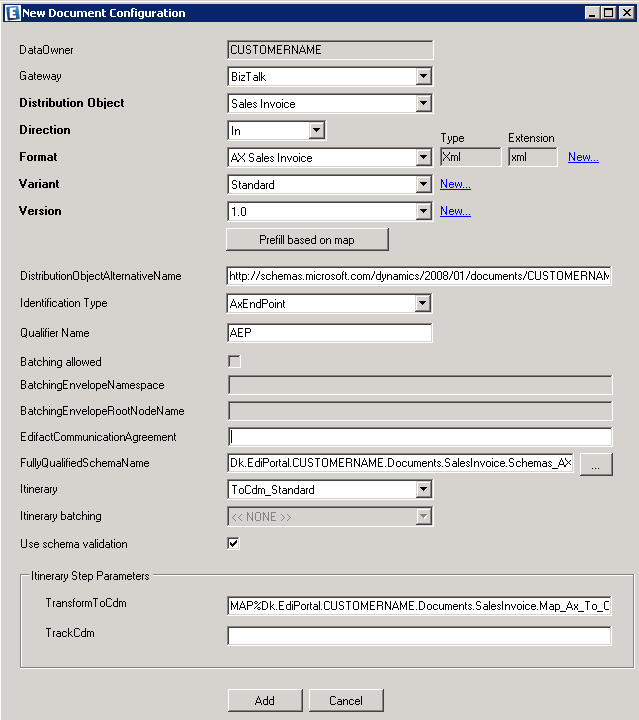
Create new DocumentConfig
It provides to create ingoing or outgoing document based on distribution. It contains more information about the document format, variant, version, itinerary, identification type and BizTalk map. The properties are explained as below.
-
Direction: specifies the in or out going document
-
Format: specifies AX Sales Invoice xml
-
Variant: specifies partner name, standard for all partners.
-
Version: specifies version number
-
Prefill based on map button: Click on this, it populates window to choose the BizTalk map. Using this, some of the properties are going to fill automatically. They are DistributionObjectAlternativeName, FullyQaullifiedSchemaName, Itinerary and Itinerary Step parameters. These values are editable. It is defined as below.
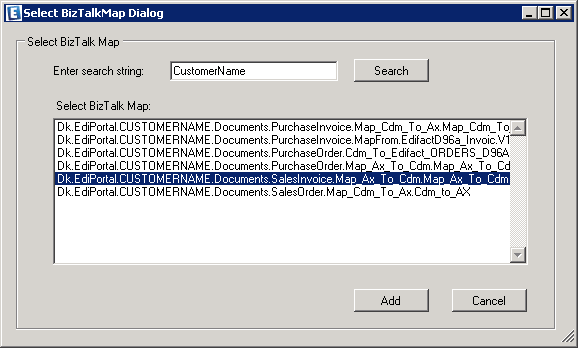
The following figure shows that sample ingoing document, AX Sales Invoice.
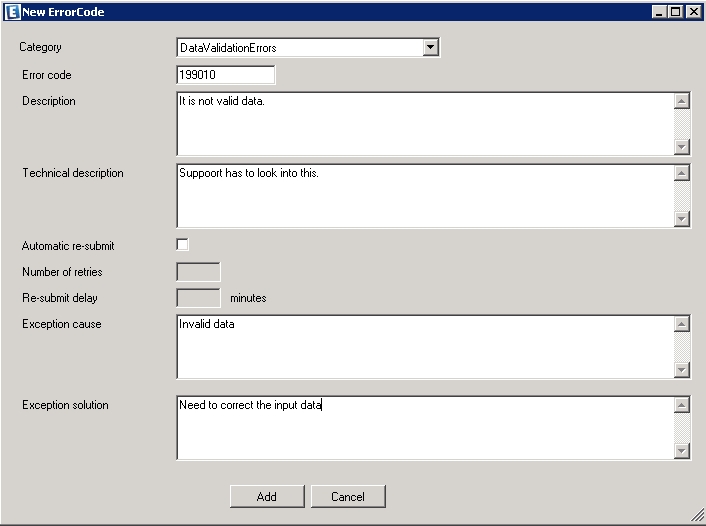
Create new Error Codes
It provides to create a new error code based on category. This error can be raised from custom pipeline component or Orchestration. The error should be minimum 6 digits. The following figure shows that sample exception message.
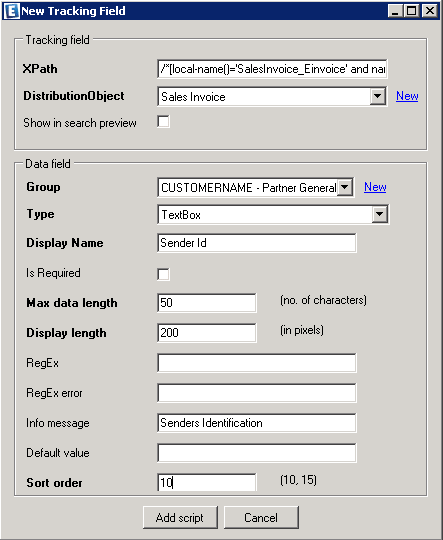
Create new Tracking Field
It provides to create a new tracking filed based on XPath and distribution Object. The property, Show in search preview is checked, means that it shows in Tracking in Link. The following figure shows that sample tracking field, Sender Id of Sales AX Invoice.
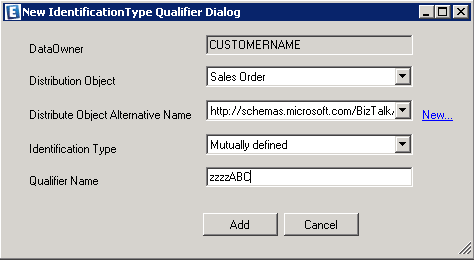
Create new Identification Type Qualifier
It provides to create a new additional identification type qualifier based on distribution object, distribution object alternative name, identification type, and qualifier name. The following figure shows that sample qualifier name.
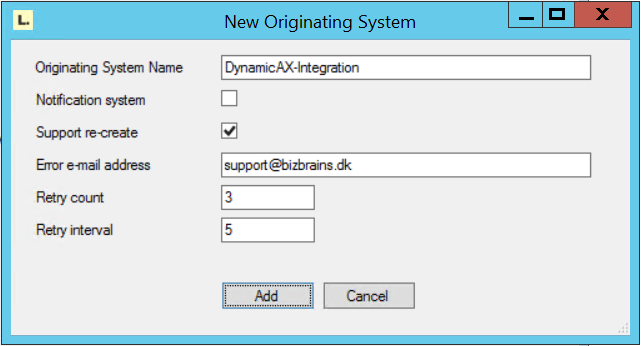
Create new Originating System / Reflection
It provides to connect the external system to EdiPortal. For example, if you want create a new origination system from DynamicAX to Link; you need to implement the .net assembly. It should contain the class, which is derived from the base class, OriginationSystemProvider.
Open the Link Administration and select the dataowner. Then select menu, Scripts>New Originating system Reflection, the following interface will come.

Click on "New…" link, to popup the new window for create new originating system. It looks like below.
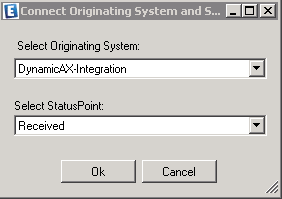
Connect Origination System and Status point
It provides to create possible status point for originating system. For example, DynamicAX integration may contain Received, AwaitingControl, Completed and Failed.
Notification System checkbox indicates that this Originating System is not to be used as an Originating System, but rather as a Notification System. A Notification System sends all subscribed status point notifications regardless of the Originating System on the Receive Location.
The below interface is an example of connect the status point, Received to originating system, DynamicAX-Integration.
Create new Transport Type
It provides to create a new transport type for receiving / sending the document. For example, we want to create a new transport type, WCF. It is used only either In or Out direction, can be configurable by Partner and also specify the pipeline if we want to modify the message after the response message. It is defined as below.
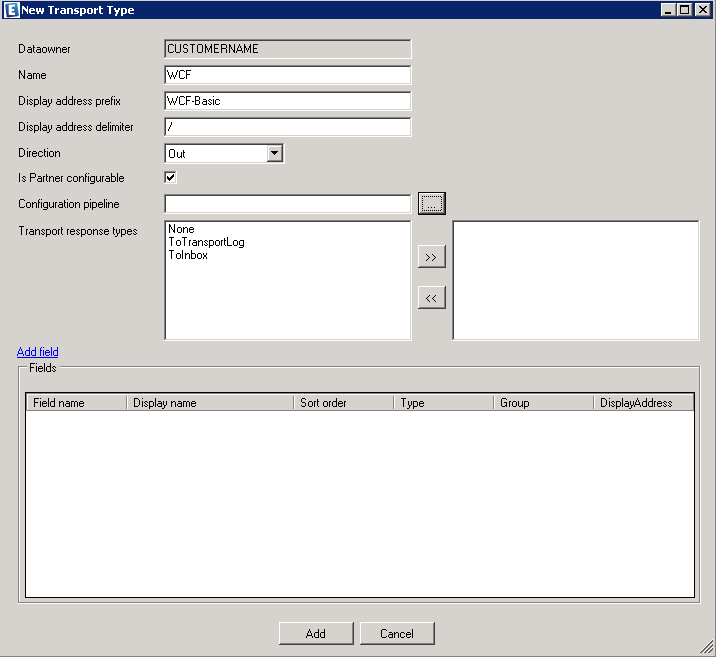
Click on "Add field" link to add required transport fields. The next section explains more details about how can add transport fields.
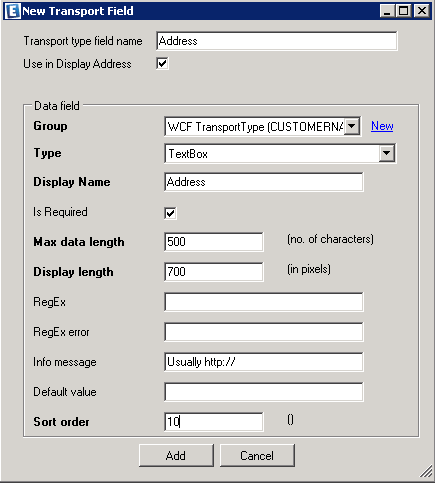
Add fields to Transport Type
It provides to add transport fields for transport type. It can be added in two ways. The first is while creating a new transport type, use "Add fields" link. The second is adding new transport files if transport type is already created. For example, we want to create new address transport type filed for WCF transport type. It is defined as below.
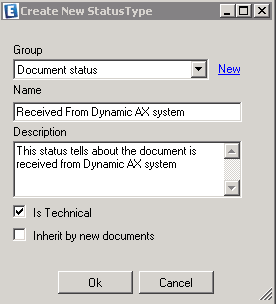
Create new Status Type
It provides to create new status type for DocumentFlow, DocumentStatus group. This user interface is defined as below. It shows about how to create a new status type, "Received From Dynamic AX system" for a group, Document status.
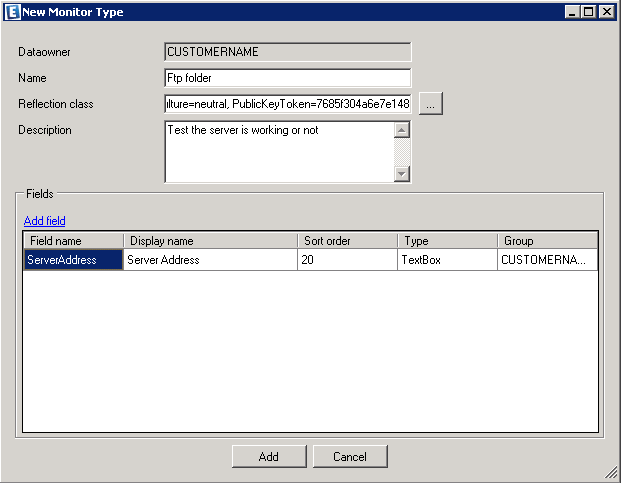
Create new Monitor Type
It provides to create a new monitor type. It is a reflection class, which should be derived from the base class, DKGateway.EdiPortal.Common.Monitor.External.MonitorPlugin. For example, we want to create Ping monitor type. It is used to ping the server is working or not. The following figure shows that sample ping moniter type. It has data field, ServerAddress, which is type of Textbox.
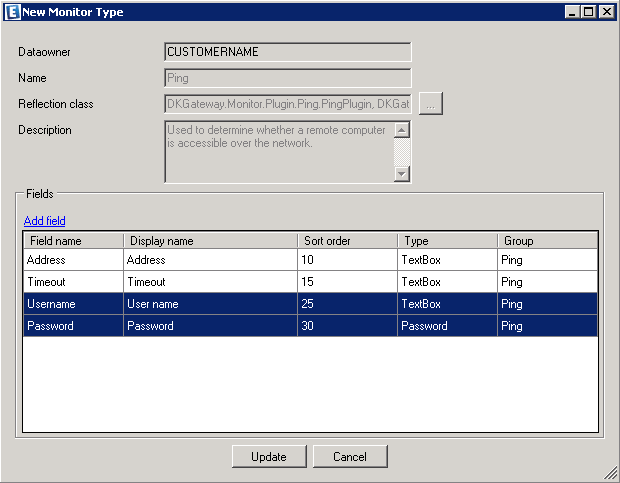
Add fields to Monitor Type
It provides to add additional fields to existing monitor type. For example, refer to Ping monitor type. Now we want to add authentication. Hence two additional fields, useraname and passoword are added to this type. The following figure shows that these two new fields are added.
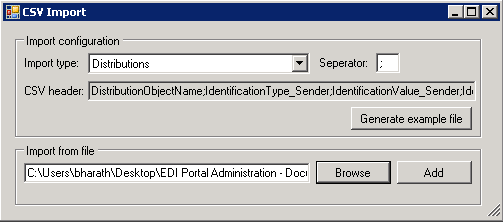
CSV Import
It provides to create partners and distributions by importing CSV file. It is very useful to create many distributions or partners at a time. This user interface is defined as below.
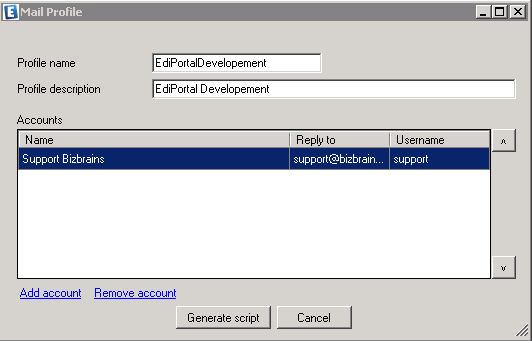
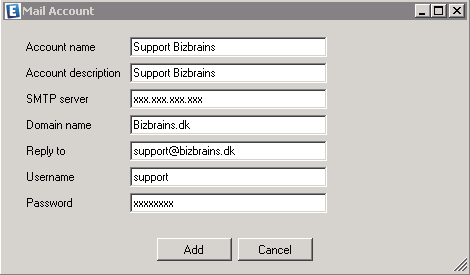
Create mail profiles
It provides to create or update the mail profile on EdiPortal based on the environment and also able to create new email account on sql server.
The following interface shows about how to do this. Here is an example of new mail profile name, EdiPortalDevelopment.
Here is an example of new mail account.
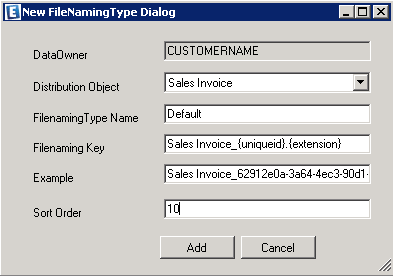
Create File Naming Type
It provides to create new file naming type based on distribution. The new file naming type, Sales Invoice_{uniqueid}.{extension} for Sales Invoice distribution and dataowner, CustomerName. The following figure shows that creating new type.
Many objects are created for Link. The main window is looks like below.
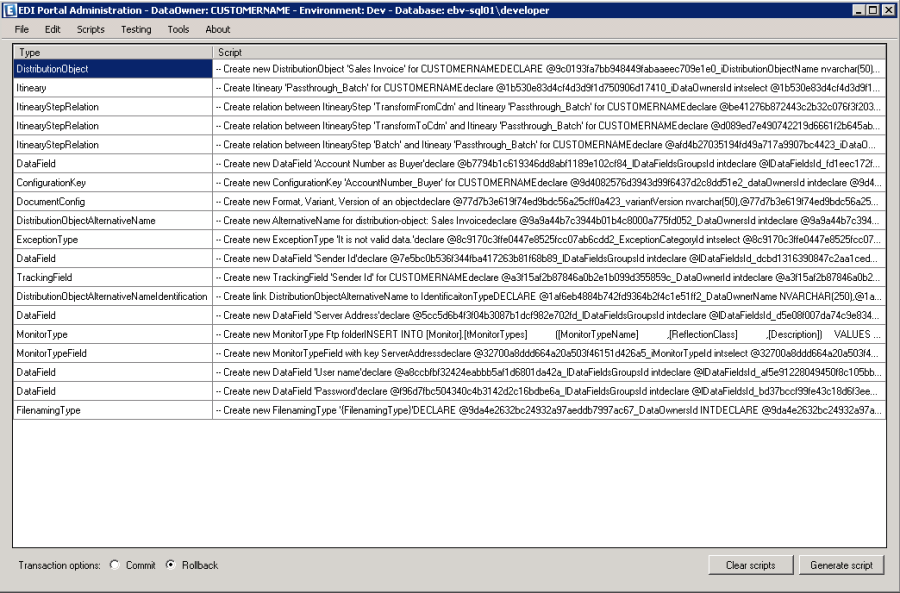
If press button Generate Script, then generates SQL Script file.
Testing
<TODO: Add documentation>
Tools
The menu, Tools has Update Pipeline submenu. It can be extended in future.
Update Pipeline
It does update pipeline with new pipeline of send or receive ports in BizTalk applications. Main objective is replacing the latest version of pipeline in all send or receive ports. It is going to be automatically and saves the time and also more accurate. The following figure shows that replacing latest version of Rec_EdiPortalDocument pipeline.
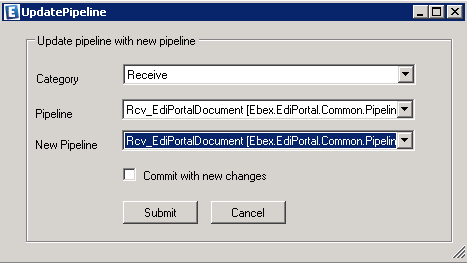
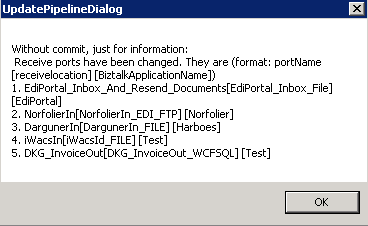
The check box, Commit with new changes is not checked means that it is not going to commit the changes, but it shows a dialog what changes are going to be. It is defined as below.
Folder
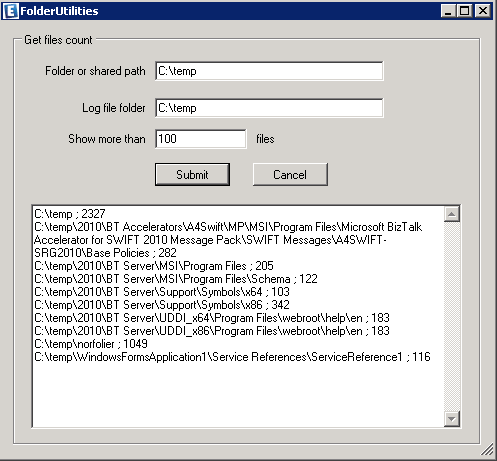
It provides to able to search the folders either in folder or share path, which are having more than files count. This is very useful to find out which folders are having more files. For example, if you want to know that my folder may contain more than 100 files includes all subdirectories. The result are in format of folder path ; filesCount . And also writes the same information into log file. This user interface is defined as below.
Generate Encryption Key
Read about it here: https://documentation.bizbrains.com/x/QQC_AQ
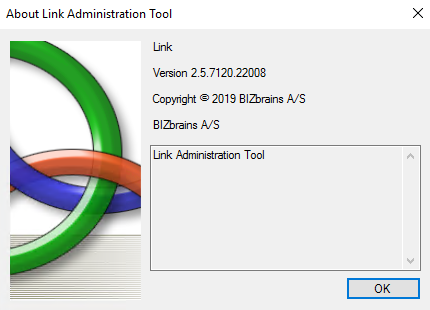
About
Click on the About menu, then know about which version of Link Administration tool is installed and copyrights. It is defined as below.
Content on this page: