The Partner Onboarding Portal is designed to simplify and streamline the process of onboarding new partners into Link. By providing a clear, structured workflow and centralized management, the system makes it possible to onboard multiple partners in parallel with greater efficiency and consistency.
Overview of the Onboarding Process
The onboarding process consists of three primary stages:
-
Initializing the onboarding
-
The partner provides information
-
Validating and accepting the submitted information
Step 1 – Initializing the Onboarding
When onboarding a new partner, the first task is to configure the onboarding form that will be presented to the partner. The onboarding form functions as a dynamic, customizable questionnaire. You decide which fields and options the partner should see. Certain basic fields—such as partner name and contact information—are always included, while additional fields are optional and can be tailored to the specific partner.
Basic Information
Begin by entering the partner’s company name and the email address of the contact person responsible for the onboarding. These values will prepopulate the onboarding form and can be updated later by the partner.
You must also provide your own email address, which is used for sending notification emails throughout the onboarding process.
Identifiers
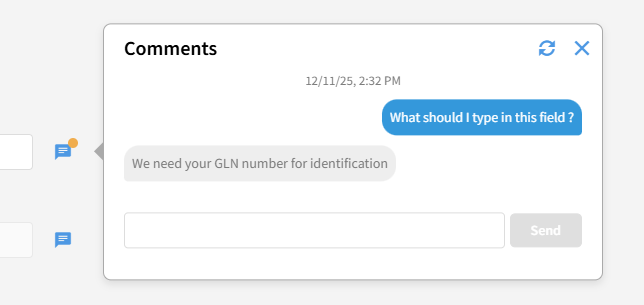
Many integrations require a unique identifier for each partner. In Link, multiple identification types can be configured, such as AS2 identifiers or more general identifiers like GLNs. When setting up the onboarding form, select the identification types that the partner can provide.
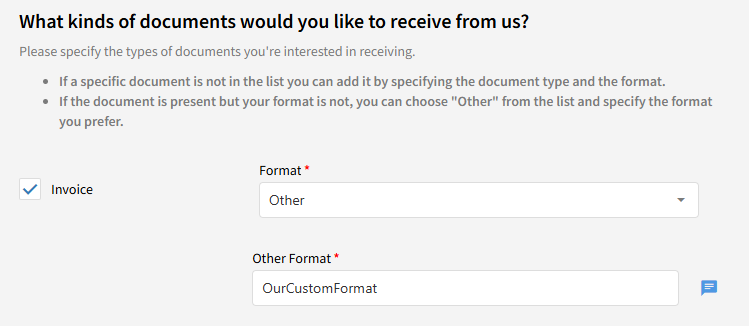
Document Types
A key part of onboarding is determining which document types will be exchanged between you and the partner. While a typical Link installation may support many document types, it is possible to select only a subset of those to be offered to the partner.
For example, if the partner is a customer, you might allow them to send orders and receive invoices and despatch advices. For each document type, choose the formats the partner is allowed to select from.
The formats available depend on the document configurations set up in Link.
Presets
If you regularly onboard similar types of partners, you can save your configuration as a Preset. Presets streamline future onboardings by providing reusable templates—for example, one preset for customers and another for suppliers.
Once the onboarding form is fully configured, an invitation email containing a unique link will be sent to the partner, granting access to the Partner Onboarding Portal.
Step 2 – Partner Provides Information
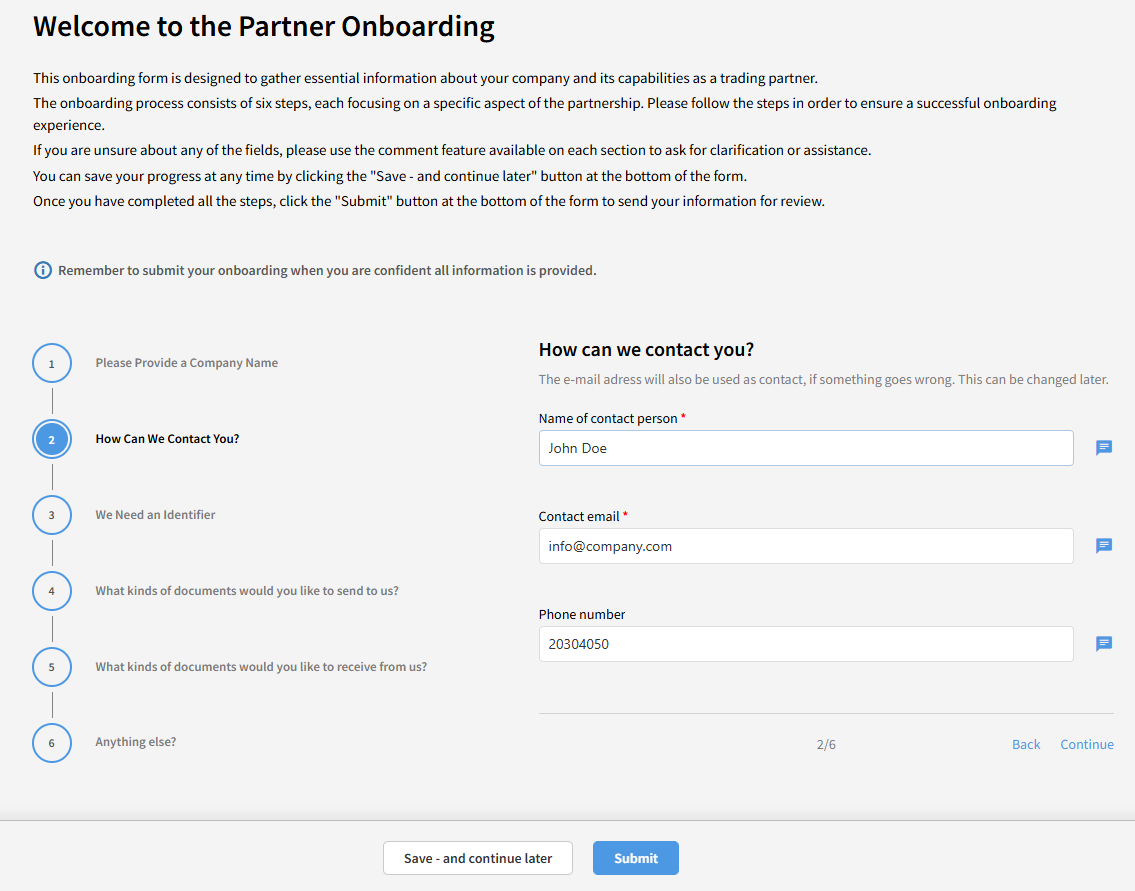
The invitation email sent to the partner includes a unique link to the onboarding portal. Although the email is addressed to the contact specified in Step 1, it can be forwarded internally if multiple individuals are involved in completing the onboarding.
Sections
The onboarding form is divided into numbered sections, displayed in a step-by-step navigation panel on the left. Although the sections are listed sequentially, the partner may move freely between them and complete them in any order.
Custom Fields
Certain sections—such as Identifiers and Document Types—allow the partner to enter custom information.
For example, if the partner wishes to send invoices in a proprietary format, they can select “Other” and enter the format name manually. These situations cannot always be handled automatically but serve as important input for further dialogue.
Communication
Effective communication is essential for a smooth onboarding experience. The portal includes a built-in Comments feature that allows both you and the partner to exchange messages directly within the onboarding context. Centralizing communication in the portal ensures that all stakeholders can easily track questions, clarifications, and decisions.
Saving and Submitting
Partners can save their progress at any time and return later to complete the form. This also supports scenarios where another colleague needs to take over.

Once all information has been provided, the partner submits the form.
After submission, all fields are locked to give you time to review the data. The partner can still access the portal to view their submitted information. If updates are required, they can request specific fields to be reopened using the Comments feature.
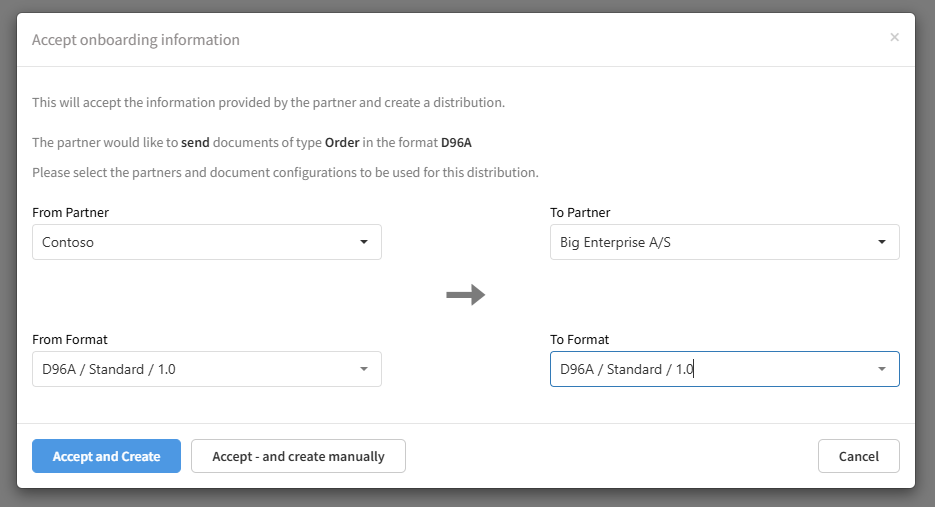
Step 3 – Validating and Accepting the Information
When the partner submits their information, you will receive a notification email. You can then review and accept each section individually.
If clarification is needed, use the Comments feature to communicate directly with the partner.
If updates or additional information are required, you may Reopen specific fields. When reopening a field, you may optionally notify the partner and explain what needs to be changed.
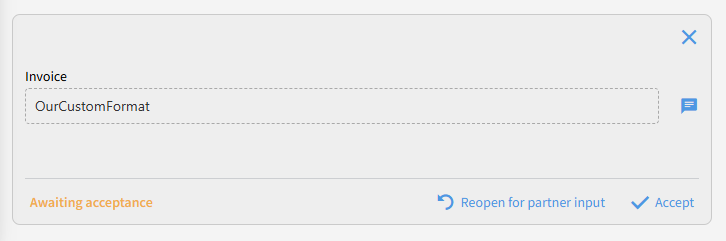
If all information is satisfactory, you can begin accepting the submissions. Depending on what is accepted, Link will automatically create the corresponding records:
-
Contact information → new partner contact
-
Identifiers → new partner identification
-
Document types → new distribution setups
Completing the Onboarding
After all sections have been accepted, click Complete the onboarding.
This marks the process as finished and helps you maintain an overview of ongoing onboarding activities. Once completed, the Partner view in Link will no longer default to the Onboarding Details tab.

Reopening the Onboarding Process
In some cases, it may be necessary to reopen a completed onboarding—for example, if the partner later needs to exchange new types of documents. Reopening the onboarding allows the partner to add new information as required.
To reopen a completed onboarding, simply click Reopen the onboarding.
