Conversions

From the Conversions tab you can create universal or partner-specific conversion tables containing key-value pairs that can be utilized by your in-built document conversions (maps). The main idea is to avoid hard-coded values in your document conversions and to make your mappings as reusable as possible. Read more in the Make your integrations reusable article.
For example, we can imagine that your ERP system needs a unit of measure in a specific format, for example ‘PCE’ for ‘pieces’, but your partner might supply it as ‘Pieces’. We can then create a unit conversion table that can be accessed from the document conversion. The user can also easily add additional conversions, such as ‘Packages’ being converted to ‘CLL’.
The layout of the tab is divided into several sections, which will be explained in detail below.
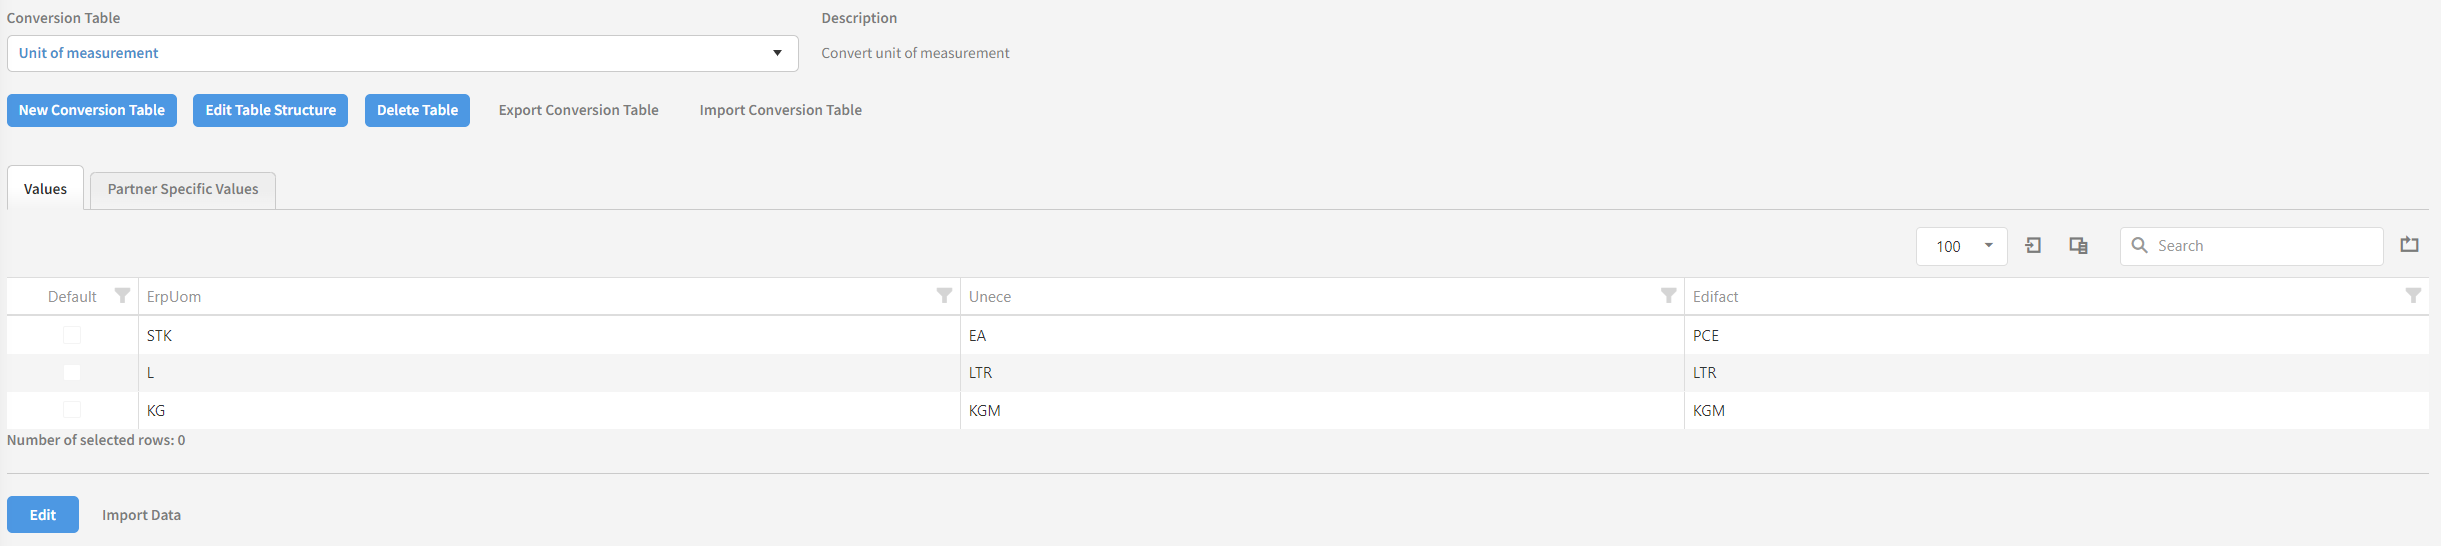
Conversion Table
Click the dropdown to see a list of all universal (global) and specific conversion tables for this partner. The universal (global) tables are marked in blue, while the partner specific tables are not. Selecting a table from the dropdown will display it in the data grid.
Description
Shows the description of the selected conversion table.
Action Buttons
Several different functions are available here. Each will be explained below.
New Conversion Table
Click this to start creating a new conversion table. The tab will be replaced with a set of fields as shown in the screenshot below (the screenshot shows an already made conversion table).
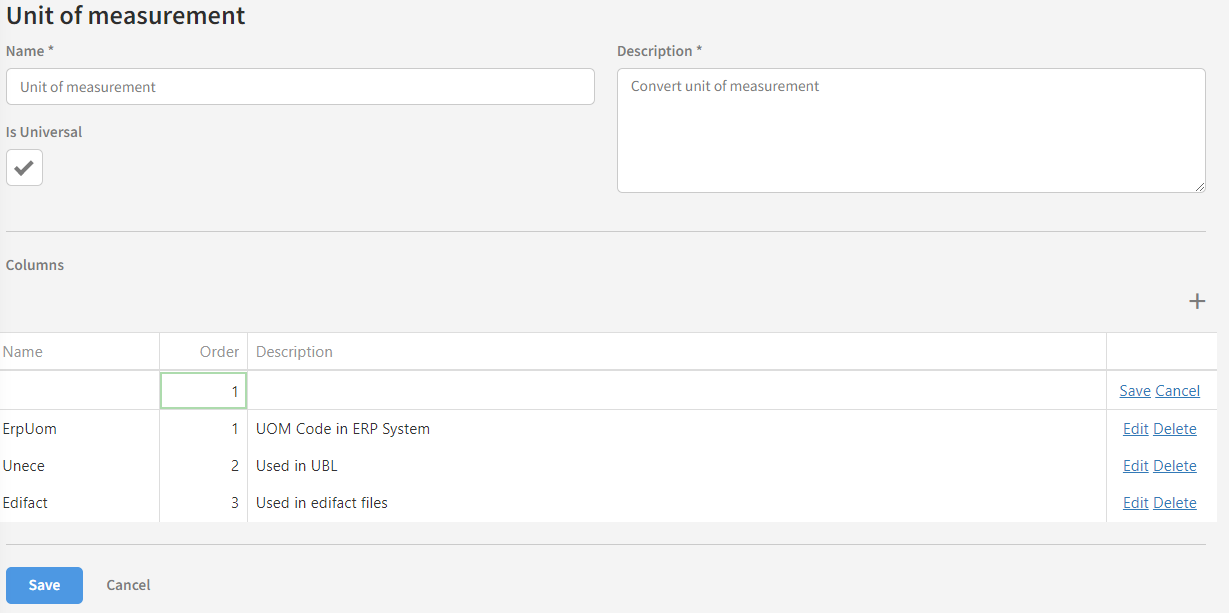
Both the input fields are required when creating a new conversion table. Enter a name and description of the table and mark the 'Is Universal' checkbox, if the conversion table should be used across multiple partners. If left unchecked, the table will only be created for this specific partner.
Press the '+' icon to add a new column to the conversion table. By default, no columns are created. When pressing it, you will need to provide a name to the column and press 'Save'. It will then appear in the list of columns.
You can also edit and delete created columns using the 'Edit' and 'Delete' buttons to the right. Pressing 'Edit' will allow you to change the name of the column. Press 'Delete' to remove the column. A prompt confirming your choice will be shown.
When you are done filling out the required fields and have added the necessary columns, press the 'Save' button at the bottom of the page. You will be redirected to the Conversion tab.
Edit Structure
Press this to edit the currently opened conversion table. The same fields as shown under 'New Conversion Table' will be displayed and available for editing. Press 'Save' when you are done adding the changes or press 'Cancel' to undo and return to the previous page.
Delete
Click this to delete the currently opened conversion table. A prompt confirming your choice will be shown.
Table Tabs
When viewing a universal conversion table, an extra tab is added here called 'Partner Specific Values'. Click it to display the conversion values that have been added for this specific partner on the universal table. The 'Values' tab simply holds the conversion values for the conversion table. It is not possible to add or remove tabs.
Edit and Import
Edit
To add, edit and remove values from the currently opened conversion table, click the 'Edit' button below the data grid. This will display a new set of available functions as shown in the screenshot below.
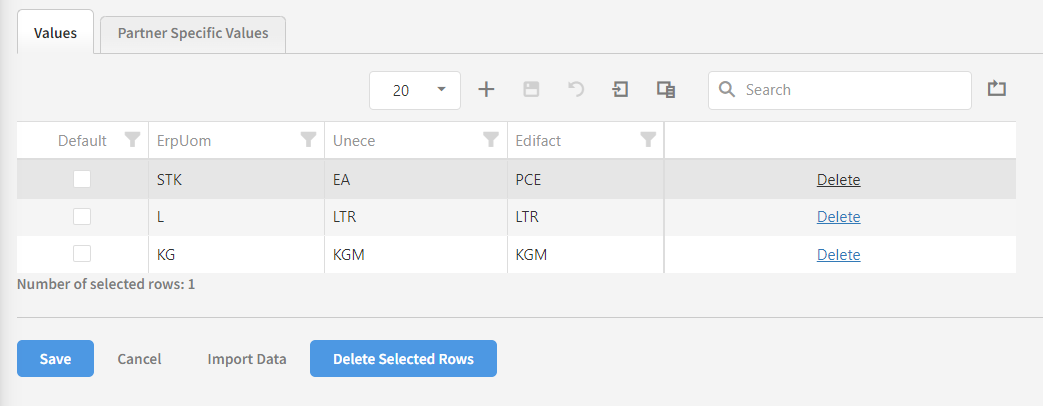
To add a new row, press the '+' button. The newly created row will appear at the top of the list. Insert the appropriate values into the columns. Continue adding columns this way until you are done.
To edit a row, simply click the fields you want to edit and replace the values. You can checkmark which row should be Default Row. You must only checkmark one row.
To delete a conversion row, click the 'Delete' button in the rightmost column. The row will turn green. Press 'Undelete' to undo the action. Several conversion values can be deleted in this manner.
When you are done editing the conversion table, press either the 'Save' button in the lower left or the 'Save Changes' icon next to the '+'. icon. Press 'Cancel' to undo all your changes and return to the previous page.
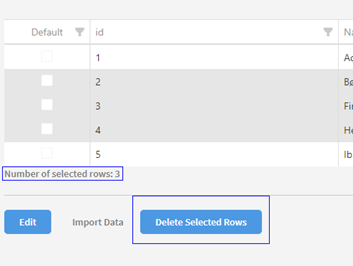
You can delete two or more rows at the same time in not-Edit-mode. You select the rows you what to delete. Selected rows are gray. After selecting rows, you click "Delete Selected Rows". You can always see how many row you have selected. Selecting row for group-deleting has nothing to do with the possibility of checkmark a Default row.
Import Data
Click this to import an existing document containing the conversion values. You will be prompted to select a delimiter for the document (Either comma, semicolon or TAB). After selecting the delimiter, paste the data into the text box and press 'Ok'.
Import/Export Conversion Table
Gives you the possibility to export entire conversion tables (and not just the content), so when you import it in a different Link environment, it will create the table and put it in the data.
Content on this page: