Setting up error rules
NOTE: This document is relevant for releases equal to or greater than v. 3.0.9091.20157. If your Link system is running an earlier release, please refer to this article instead.
After having set up your Stakeholders, you are now ready to configure how Link should handle document errors.
What are error rules?
Error rules are the new way Link determines how to act if the message flow encounters an error. Broadly speaking, an error rule consists of a list of conditions that must be met in order for the rule to be activated, as well as a list of actions to perform on activation.
When the message flow encounters an error, Link goes through the list of defined error rules looking for a match. Error rules are evaluated in the order they appear in the grid in the UI, and the first rule that matches the conditions is chosen. This means that the order of the rules actually matters to the functionality, which is why the error rules grid allows the user to re-order the rules. Generally speaking, error rules should be ordered based on how specific they are.
Here is an example: You have two error rules. One rule has only one condition, that the document type is a sales invoice, and sends an email to the economy department stakeholder. The other rule has two conditions, that the document type is a sales invoice and that the recipient is a specific partner, and if matched it sends an email to the partner in question. If the rule that just checks that the document type is a sales invoice comes before the second one in the list, no failed document will ever be matched to the second rule, because any sales invoice that fails will be caught by the first rule.
You will find the "Error Rules" page under "Settings" in the main menu.
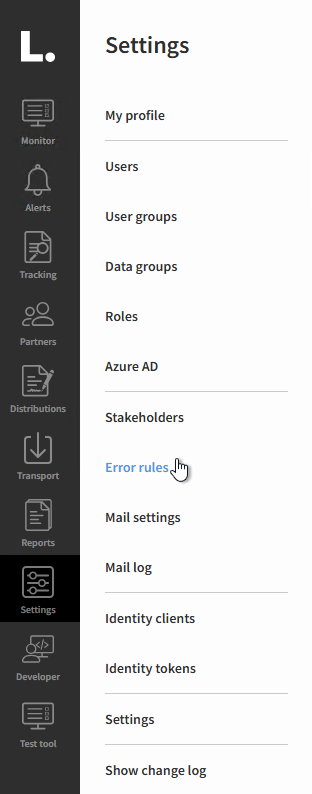
Error Rules in the Settings menu
Error Rules grid
If your Link system started as v. 3.0.9091.20157 or higher, initially the grid will contain only a single error rule, namely the default rule that all errors will get matched to if they are not matched to any other rule.

However, if your Link system started on an earlier version and was later upgraded to v. 3.0.9091.20157 or higher, the grid will also contain rules converted from the setup in the old error handling functionality, which might look something like this:
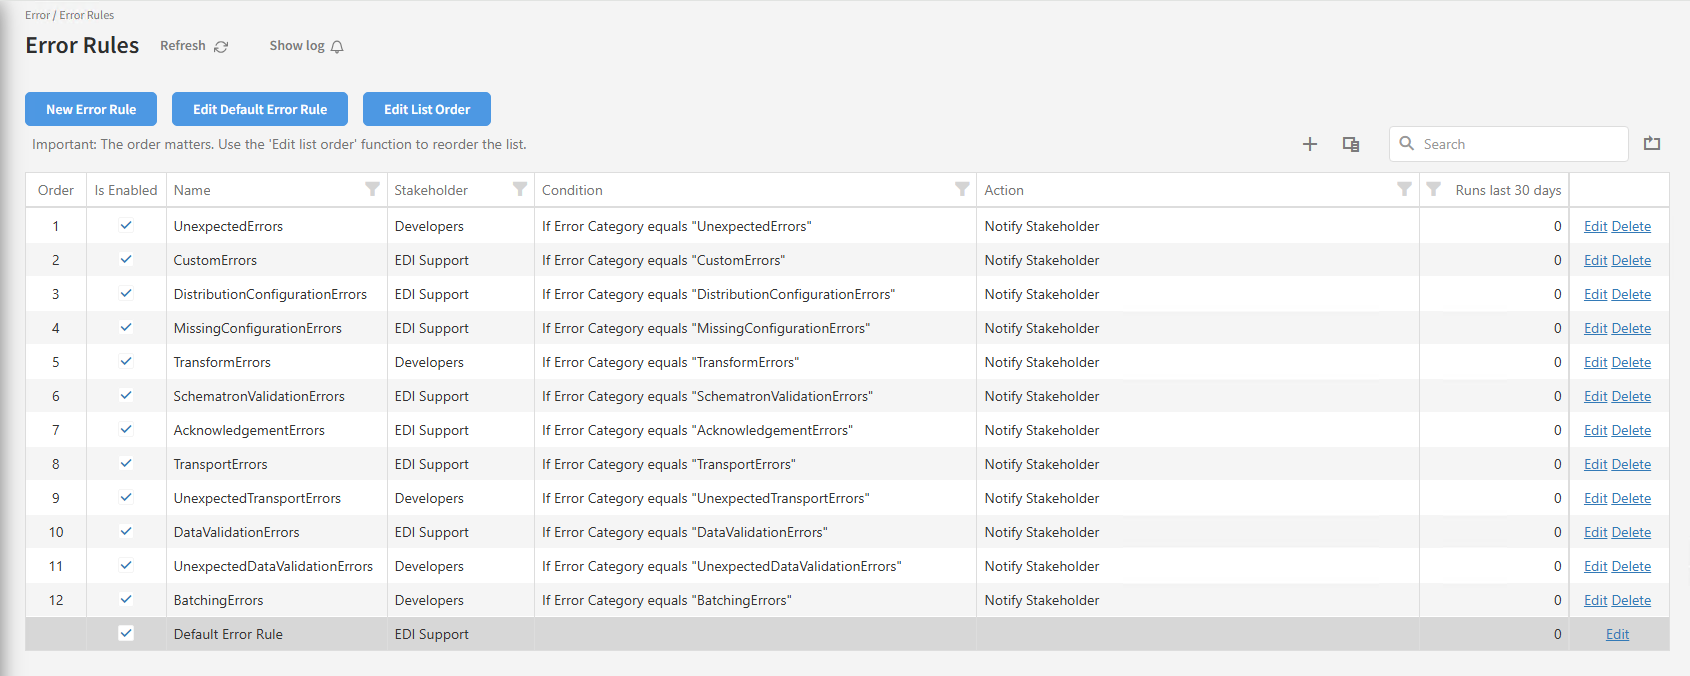
These rules from the old setup simply match an error category to a stakeholder. They are converted from the old setup during an upgrade in order to ensure that the system will function the same after the upgrade as before, but if you find that the rules are not sufficient for your purposes, you can just change or delete them as you see fit.
The Default error rule
The Default rule cannot be deleted or moved, it always lies at the bottom of the list. It can be configured, but it cannot contain any conditions.
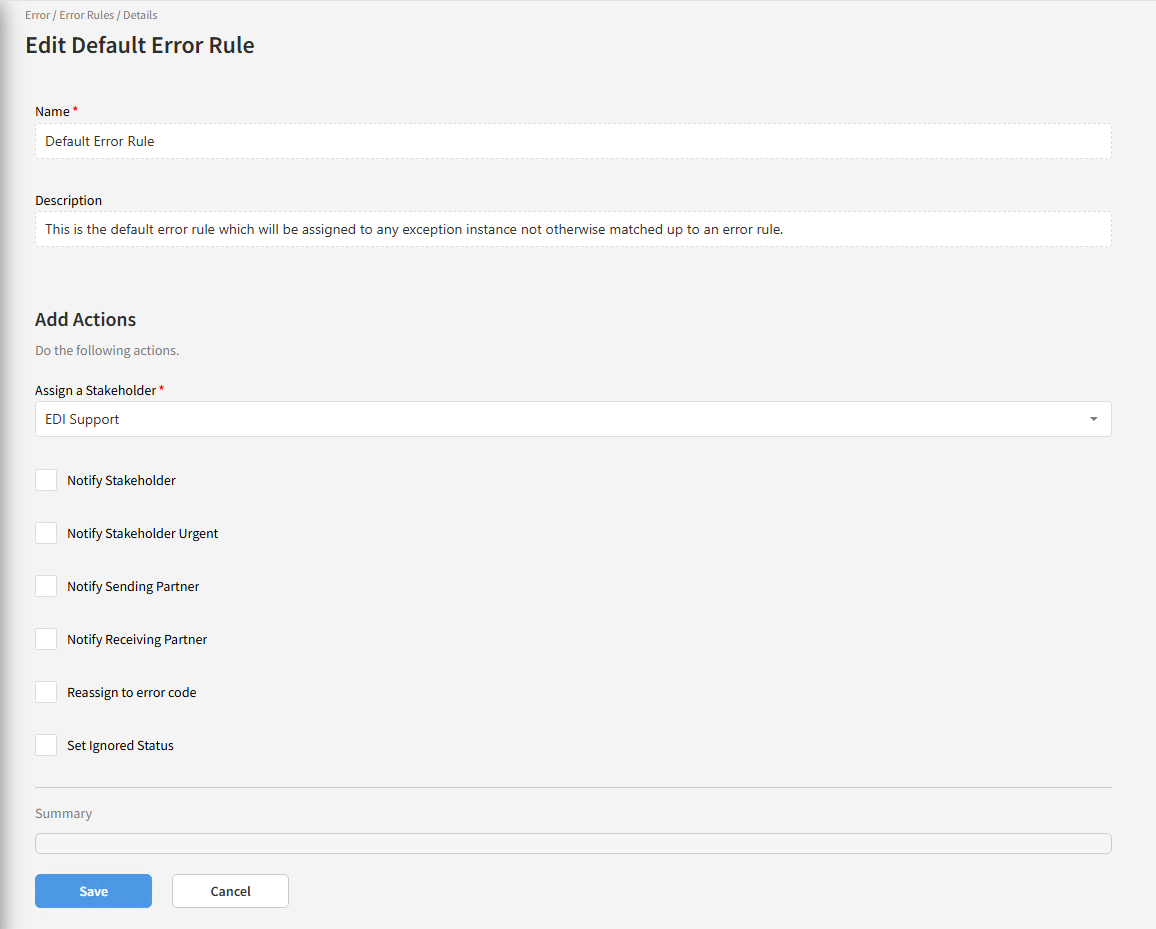
Remember that the default rule is used for every failed document that is not specifically matched to another rule, so you should avoid giving it actions you do not wish to be run for all types of document. For instance, it is probably not a good idea to notify the sending or receiving partners on the default rule, as that is generally something you need to clear with a partner in advance.
Also keep in mind that while an error rule must have a stakeholder, it is not required to send emails to that stakeholder.
Setting up an error rule
Let us start with an example. Let us say you are sending out sales invoices to customers, but sometimes something about the registration of the customer in the ERP system goes wrong. As a result, the generated invoice has no account number for the customer to transfer the money to. When this happens, you want the system to send an email to the Economy Department so they can correct the customer registration and then resend the invoice.
First of all, you want the document to fail if the account number is missing. To this end, in the mapping from the incoming invoice file to the CDM, you register a custom error code with a message stating that the account number is missing. Then in the XSLT code you add a check of whether the invoice contains an account number. If not, you raise an error to fail the document, using the custom error code defined earlier.
Now you need to set up an error rule to catch these failed documents and to notify the Economy Department when this happens. We start by setting up the basics, giving the rule a relevant name and description.

Next, we need to add the conditions to be used for matching the rule, so only the documents fitting the scenario outlined above will trigger this rule. The scenario is specifically about sales invoice, so we'll add a condition for that. Also, the scenario relates to one specific error, so we add a condition to match the error code to the one we defined in our mapping.
Note that all conditions are evaluated with an AND between them. In other words, in order for a rule to be matched, all conditions it contains must be true.

We will get into all the options for setting up conditions later on.
Finally we need to set up the actions for the rule, telling it what to do when it is matched. We want it to notify the Economy Department, so we add the Economy stakeholder to the rule and tell it to notify the stakeholder when triggered.
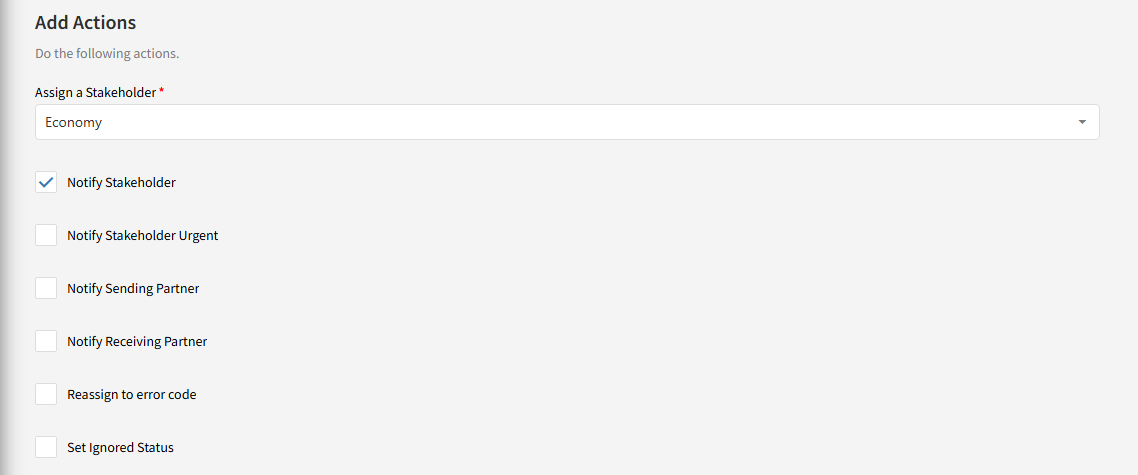
We will also go through all the possible actions later on.
The rule is now complete, and all that remains is to save it to the system. Note the summary at the end which briefly sums up how the rule is configured.
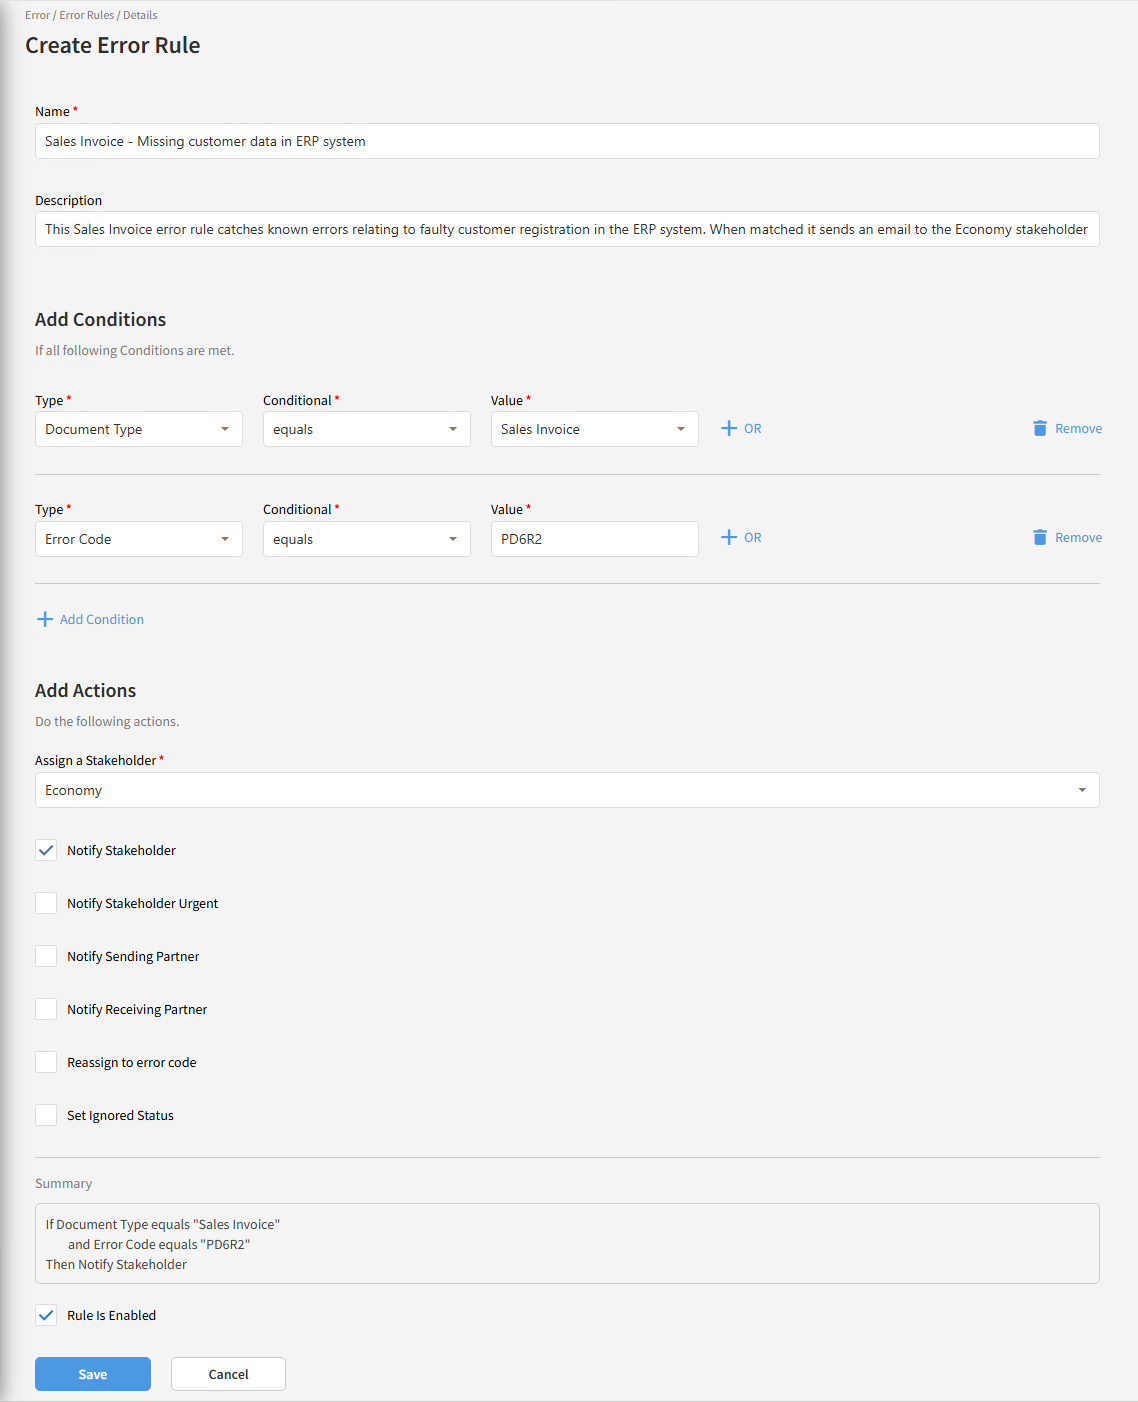
It now comes to our attention that there is actually another error scenario very like this one. Sometimes a customer gets registered in the ERP system without a VAT number. Since the invoice needs to include this VAT number, the action taken should be the same: notify the Economy Department and have them correct the customer data and resend the invoice.
Now, we could make an entirely new error rule identical to this one, only matching a different error code. This is not necessary though. We cannot add another condition matching a different error code, since all conditions must be true, and a failed document only has one error code. However, a single condition can match multiple values using OR logic, so only one of the values have to match in order for the condition to be true.
All we need to do is to click the “+ OR” link after the Error Code condition to add another valid value for the match.
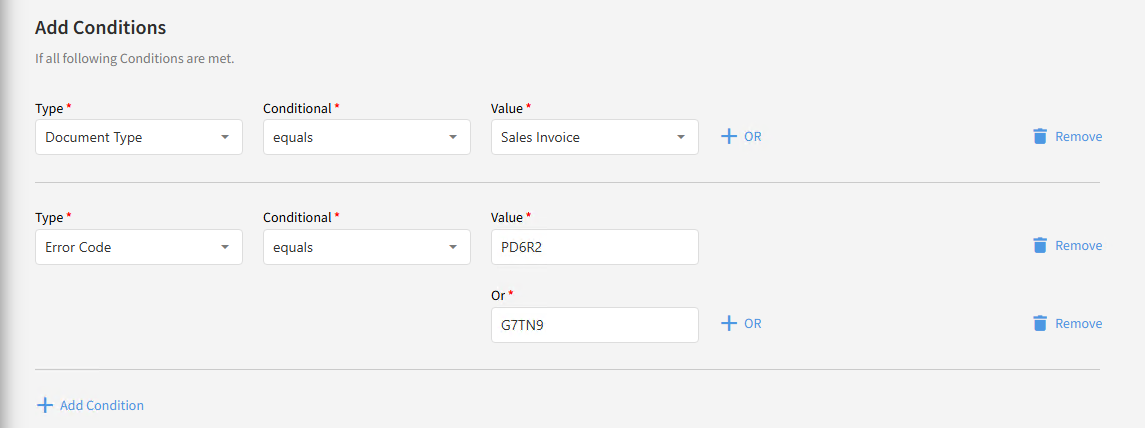
Note that the summary is automatically updated to reflect the configuration change.

Conditions
Conditions broadly fall into two categories: simple conditions and configuration key conditions. The distinction only exists because configuration key conditions need an extra bit of information in order to work.
The UI for a simple condition looks like this:

The Type field is a dropdown containing the various kinds of data you can make conditions for. The Conditional field is a dropdown containing the various kinds of comparisons you can use for the condition (equals, is not equal to, contains). The specific conditionals available varies from Type to Type. The Value field contains the value to check the document data against. Depending on the Type chosen, the Value field can be either a text field or a dropdown.
If you select a configuration key condition in the Type dropdown, an extra field, Sub Type, appears:

The Sub Type field is a dropdown which lets you choose between all the known configuration keys of the type indicated by the selected value in the Type dropdown. The Conditional and Value fields work the same as above.
Simple condition types
Here is an overview of all the simple types, their conditionals and the type of Value field they generate:
Type | Conditionals | Value |
|---|---|---|
Document Type | equals, is not equal to | Dropdown with all the configured Document Types |
Document Type Group | equals, is not equal to | Dropdown with all the configured Document Type Groups |
Error Category | equals, is not equal to | Dropdown with all Error Categories |
Error Code | equals, is not equal to | Text field |
Error Text | equals, is not equal to, contains | Text field |
Receiving Partner | equals, is not equal to | Searchable partner picker control |
Receiving Partner Tag | equals, is not equal to | Dropdown with all the configured partner tags |
Sending or Receiving Partner | equals, is not equal to | Searchable partner picker control |
Sending or Receiving Partner Tag | equals, is not equal to | Dropdown with all the configured partner tags |
Sending Partner | equals, is not equal to | Searchable partner picker control |
Sending Partner Tag | equals, is not equal to | Dropdown with all the configured partner tags |
Note that all conditions of one of the “Sending or Receiving Partner” types are considered true if the condition is true for either the sending or the receiving partner.
Also note that for conditions using the “is not equal to” comparison, you cannot add multiple values. The reason for this is that multiple values for a single condition are evaluated using OR logic, which means that a condition with two or more values evaluated as “is not equal to” would always be true, since a single value would always not be the same as at least one of the values indicated. As such, if you need to exclude multiple values from a match, you have to make separate conditions for them, as separate conditions are evaluated using AND logic.
Configuration key condition types
There are 4 condition types related to configuration keys. These are: Distribution Configuration, Receiving Partner Configuration, Sending or Receiving Partner Configuration and Sending Partner Configuration. When one of them is chose, the Sub Type dropdown appears, and lets you choose between all configuration keys of the relevant type.
The available conditionals and control type of the Value field varies depending on the data type of the chosen configuration key. Here is an overview of all of them:
Configuration key data type | Conditionals | Value |
|---|---|---|
CheckBox | equals, is not equal to | Dropdown with the values True and False |
DropDown | equals, is not equal to | Dropdown with the choice values defined in the configuration key |
| equals, is not equal to, contains | Text field |
| equals, is not equal to, contains | Text field |
| equals, is not equal to, contains | Text field |
TextBox | equals, is not equal to, contains | Text field |
Note that while configuration keys with the data types File, Label and Password can be chosen in a condition, the error rule engine cannot do anything sensible with them. It also does not make a lot of sense to create conditions based on them, so please refrain from doing so.
Actions
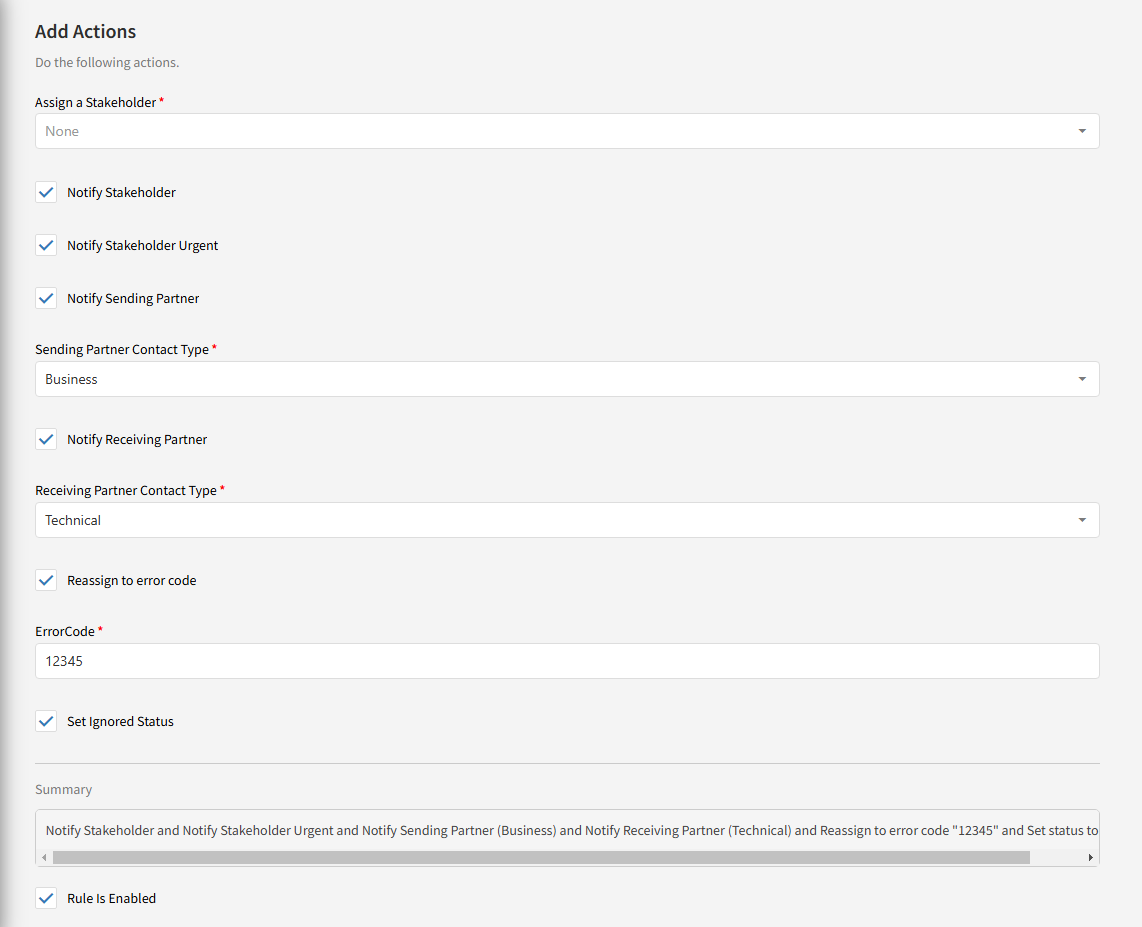
Here is an overview of the actions you can assign to an error rule.
Assign a stakeholder
This is mandatory. All error rules must have a stakeholder.
Notify Stakeholder / Notify Stakeholder Urgent
Both of these actions send an email to the stakeholder when a failed document is matched to this error rule. The urgent option sets the urgent flag on the email, and sends the mail to the address(es) configured as urgent on the stakeholder, or the stakeholder’s normal email address(es) if no urgent ones are configured.
Notify Sending Partner / Notify Receiving Partner
When either of these options are chosen, you must choose which contact type to use. In order for it to work, the partner in question must have a registered contact of that type, and the contact in question must have an email address configured. These options should probably only be used after prior arrangement with the partners in question.
Reassign to error code
This gives you the option to assign a new error code to failed documents matched by this error rule. The usage scenario is that you may have a number of specific distinct types of error that you want to be able to search for in the tracking as one. This could be something like specific errors for various data points missing in a document that you want to be able to search for using a general “Missing Data” error code.
Set ignored status
Choosing this option will automatically set the status of failed documents matched to this error rule to Ignored. Use this if you have known errors that you know you don’t have to do anything about. This could be something like a specific customer’s system sometimes sending orders without any lines, but you know from the customer that these orders do not matter and can be safely ignored.
Rule Is Enabled
As the name suggests, this option defines whether or not a rule is active. It is generally not recommended to have a lot of inactive rules lying around, but it may be useful to be able to temporarily switch off a rule for testing purposes.
Service log
When a document or interchange fails, the exception instance service is activated. The service goes through each error rule in order, trying to match it up to the document in question. When it finds a match it performs the actions indicated by the error rule.
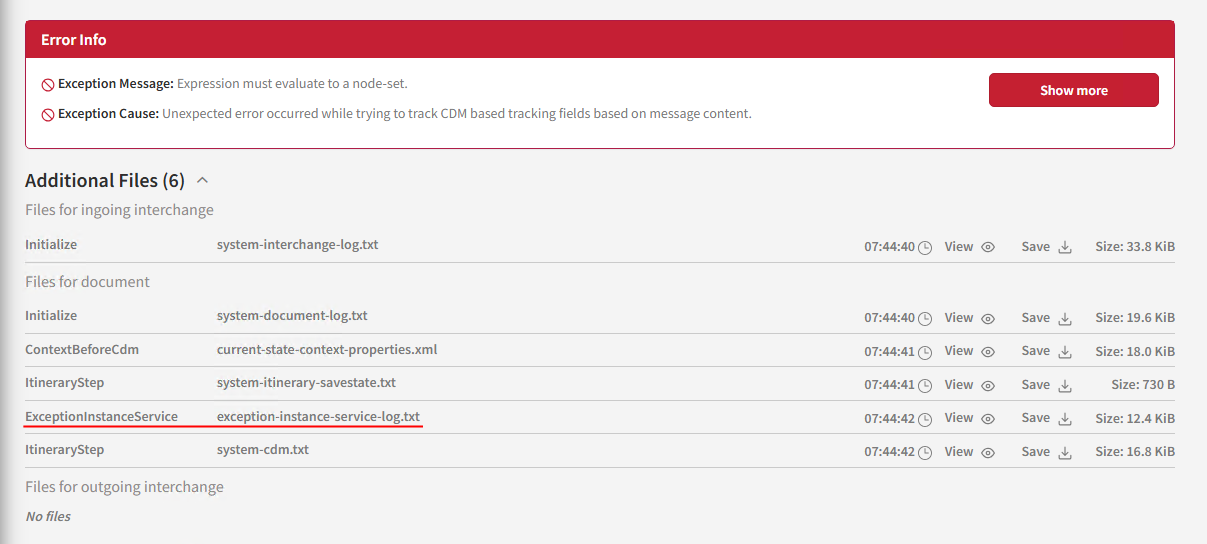
The service saves a log file on the document/interchange, so if you are having problems understanding why a failed document might not have triggered the actions you expected, you can look at the additional file exception-instance-service-log.txt on the document or interchange. The log will tell you exactly what rules were looked at in which order, which criteria failed to match and what was eventually matched.
Please note:
If a document fails with a LinkException setting the status to something other than Failed (e.g. Ignored), error rule resolution is skipped.
