Tracking Search Detail
From this screen you can read different details about the document. A very convenient and powerful option when you need to error-track a document is the ability to download the document the way it looked during all stages of the document flow. You can see how it looked when it came in from the sender, how it was transformed and how it was ultimately outputted to the destination location.
As an example for this guide, we have chosen a Purchase Invoice document.
The document details screen can be divided into several smaller sections, which will be described in detail below.
Show multiple documents
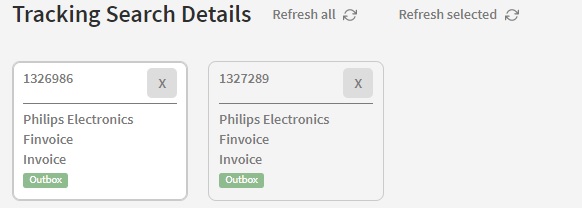
You can have multiple documents shown from your search result. This is be display with a box per document.
To remove a document, click in the top-right corner of each document. When clicking this button, the document will be removed - and it will be reflected in the URL.
Action Buttons
At the top of the page several actions buttons are available. These allow you to perform actions on the currently viewed document.
![]()
Resend
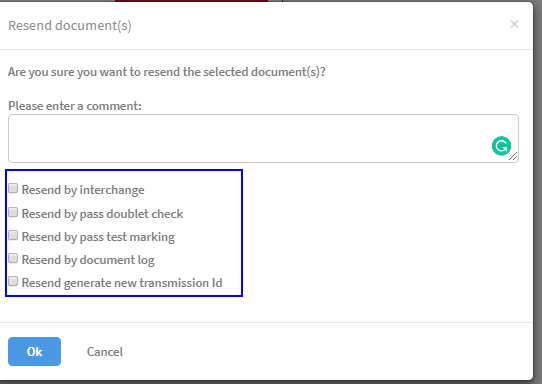
By pressing the ‘Resend’ button, you will get the opportunity to resend the message.
Resending will force the original message to enter Link once more.
The is a number of options when you are resending.
|
|
|
The step from Interchange In to Message In is called disassembling. The Interchange Infile is the file that arrived to Link. If the Interchange In file is a batch file, it will be de-batched in the disassemble step.
|
Plain resend
If you don't mark any of the options, the Message In will be resend. (Look at the first screen dump to see where Message In is in the flow)
Resend by interchange
If you mark Resend by interchange, and resending the document(s) the flow will start at from the beginning with the disassembling step. If the incoming file is a batch of documents, the batch will be disassembled and all the document will go through Link again.
If the ingoing message is a EDIFACT, the same interchange number will be reused.
Resend bypass doublet check
If you mark Resend bypass doublet check, the duplicate check will not be executed on this message. That means that although there is a duplicate message to the resend message, you will not get a duplicate error.
Resend bypass test marking
If you mark Resend bypass test marking the document will be processed even though it is test marked. E.g. has Edifact a test mark property.
Resend by document log
The name should have been Resend with document log.
If you mark Resend by document log, an extended logging will be done. This log is called Document Log. This feature is mainly for the developer, who is debugging.
Resend generate new transmission Id
If you mark Resend generate new transmission Id, a new Transmission Id will be generated on the outgoing interchange, which might prevent the receiver from detecting duplicates.
Manually Handle
If you press this button, you will mark the document with the ‘Ignored’ status. Link will do nothing further.
Recreate
Sends a request to the sender system to send a new message. Requires a plugin to be implemented.
Delete
Clicking this will delete the document. A window asking whether you are sure about the deletion will appear. Press 'Ok' to delete the document. You will then be redirected back to the Tracking Search screen. Note that deleting a document is irreversible!
Show raw document details
This will display all technical details about the document. They will not be further explained here.
Files
Below the action buttons you can see each individual document as it appears in the document flow. For each document you have the option to either view it in the browser, or save a local copy. Some documents are also able to be viewed as a stylesheet, indicated by the 'Print' icon.

The document flow runs from top to bottom, meaning 'Interchange In' contains the Ingoing document, while 'Interchange Out' contains the outgoing document. In the middle of the flow is the 'CDM'. The CDM document holds all the relevant data items for a certain type of document in a very structured manner. The good thing about using CDM documents in the middle of document conversion is that you are likely to be able to reuse your conversion logic.
Between the Interchanges and CDM are the messages. Depending on the format of the document being sent, these may be identical to the Interchange document. If a document has an envelope around it, this will have been removed in the 'Message In' file.
The size shown to the right of each document refers to the size of the zipped document.
Clicking 'View' will open the document in a new tab in its raw format.
Document
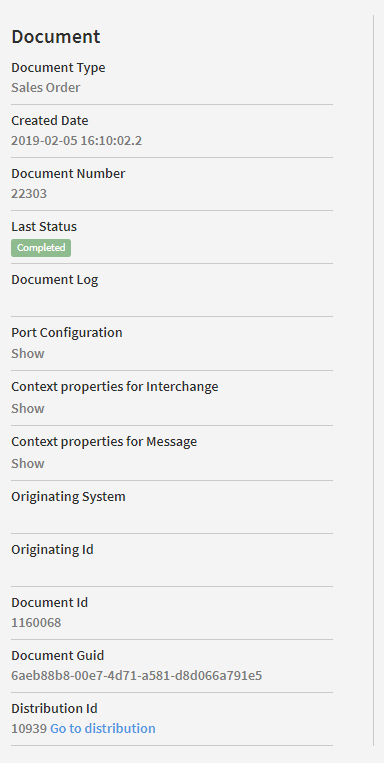
The document section contains information about the document. Depending on the document and its current status, some data may not be available. It also contains a shortcut to the distribution associated with the document.
We will not go into too much detail about each specific piece of information here.
Document Type
The document type of the document is shown here, e.g. Purchase Invoice, Sales Order etc.
Created Date
Shows the date and time the document was created.
Document Number
A unique document number will be shown here. It may vary depending on the document type exactly which field it refers to.
Last Status
Shows the latest status of the document.
Document Log
Document trace enabled from the Ingoing side. Is turned off by default.
Port Configuration
Click 'Show' to see data that have been configured on the receive pipeline.
Context properties for Interchange
Metadata about the message, before being disassembled. Will only show if they have been saved by the system.
Context properties for Message
Metadata about the message, after being disassembled. Will only show if they have been saved by the system.
Originating System
System that communicates between the sender system and Link.
Originating Id
The id of the transmission from the originating system.
Document Id
A unique id given to the document by Link.
Document Guid
A unique Id given to the document by Link.
Distribution Id
Displays the distribution id and contains a link to the distribution associated with the document.
Ingoing / Outgoing
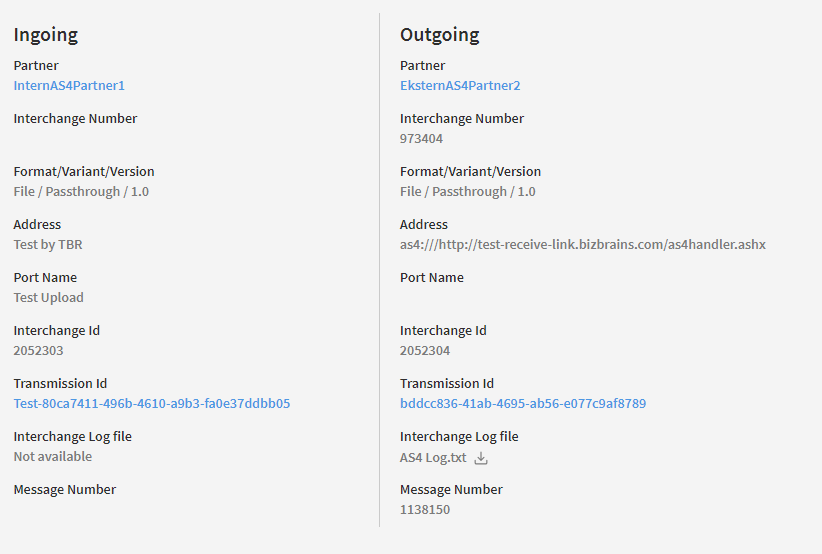
The ingoing and outgoing sections contain information about the sender and receiver party. The data displayed here is dependent on the different partners involved in the document flow.
Partner
Shows the partner name. Click it to be redirected to the page for that partner.
Interchange Number
Will contain the interchange number, if message is in Edifact format. Otherwise it will be generated on the outgoing message.
Format/Variant/Version
Shows the format of the document. In the example above, the document is in a standard Edifact INVOIC D96A format.
Address
Displays the address from where the document was sent, and where it was sent to.
Port Name
The name of the receive port if one exists. Otherwise a custom label.
Interchange Id
Generated interchange id. Mainly used for internal systems.
Transmission Id
Transmission Id is an ID which that is unique for an interchange.
Interchange Log File
Transport log file. Is only available on some protocols.
Message Number
Will contain the message number, if message is in Edifact format. Otherwise it will be generated on the outgoing message.
Message Number Out
It is present in the outgoing section as message number. The MessageNumberOut is a global auto generated sequence number that we are generating in the database. It is a value taken from the column Tracking.tDocuments.MessageNumberOut. It is an ID that is unique per document per transaction. So, if a document is resent, it will have the same DocumentNumber as the original document, but it will have a new MessageNumberOut value. It is the value we use for UNH IDs in edifact documents. It is a sequential value, based on a cross data owner sequence. It can be used as part of document using 'Document value extactor Functoid'
Tracking Fields
If any tracking fields have been configured for the document type, these can be shown here. Press 'Load tracking fields' to display them on the page. See the 'Tracking Fields' page in the user guide for more information on tracking fields.
Status Flow
At the bottom of the tracking search detail page is the status flow. This contains information about the various steps that have occurred in the document flow, such as messages being sent and received. This information is especially useful, if there are several servers involved in the document flow. Each step holds data about the current status of the document at that time, as well as a short description of what occurred. The status flow is displayed as a data grid, which means it supports standard sorting, filtering and grouping functionality.
![]()
By default only simple status types are displayed. If you need to have more technical status types displayed, you can tick the 'Include technical status types' [1] checkbox. The status flow will now show you all the steps involved in the document flow.
To the right of the data grid you have several options available [2]. These are also described in detail on the 'Tracking Search Result' page in this guide.
Export
Clicking the export button will present you with a dropdown of two options:
-
Export all data
-
Export selected rows
These allow you to either export the entire data grid as it is presented, or a specific set of rows. To select a row, click the empty checkbox in the furthest left column. You can deselect a row by clicking it again.
The data grid will be downloaded as an .xslt file, which can then be opened in an Excel program.
Column Chooser
This option makes it possible to customize which columns should be displayed in the data grid. Some columns are selected by default. When selecting it, you will be presented with a small window that contains all the columns that are not currently in use.
You can scroll while hovering your mouse over window box to see additional columns. To insert a new column you must drag it from the window to to the data grid. A blue line will appear when dragging, which means the column will be placed between the two columns. You can drag any column back to the window in the same manner.
Search
When data grids become too large, you may need to search for a specific document. The search box will perform its search on the entire data grid and will exclude the rows that do not match the search dynamically. Note that it is not possible to search for specific dates and time intervals.
![]()
Reset
Clicking this will reset the state of the grid to the default state. This means that all current sorting, grouping, filtering etc. will be reset. If you have placed or removed any columns via the column chooser, these will be reset as well. Any currently selected rows will be deselected.
Data Grid
There are several functions available on the data grid itself. These will be explained in more detail below.
Sorting
To sort the data, simply click on the column you wish to sort by. The first sorting done when clicked will be in ascending order. Click the column again to sort in descending order.
Grouping
Organizing data in groups can help you get a quick overview of your data set. To group your data, drag the desired column into the small space above the data grid, where this text is displayed: "Drag a column header here to group by that column". See the animation below for further reference.
![]()
After you have dragged and released the column, a new window will appear, showing how many items match each group. Click the small arrow to the left to expand each group and see the individual items. You can sort the groups by clicking on the group header.
To add more groups, simply use the same drag and drop method as explained. Each group will then contain several subgroups depending on how many groups you selected.
To return to the standard data grid, you can either drag the groups back onto the data grid, or click the 'Reset' button next to the Search bar.
Filtering
In order to exclude certain rows from the data grid you can make use of filtering. The filtering option is located to the right of the column name. By clicking it a window will appear, which show you the different values for the selected column. Click the checkbox next to the value to filter by it. 'Select All' will filter by all the values. See the animation below for further reference.
![]()
You can go back and change your filtering options, by clicking the filter icon again. To filter by more than one column, simply select the filter icon for each column you wish to filter by.
To reset the filtering, you can open the filtering options for each column and remove the checkboxes. Alternatively you can reset the entire data grid using the 'Reset' button next to the Search bar.
Pagination
If you include the technical status types, your status flow may include many items, which means the data may need to be split up into several pages. At the bottom left of the data grid you have the option to choose the number of items that should be displayed on a single page. You can display from 15 up to 1000 items on a single page.
You can navigate between pages in the bottom right of the data grid.

Additional Backup Files
The additional back files are used to save extra files, during the flow, other than the default backup files (Interchange In, Message In, CDM, Message Out, and Interchange Out). The Additional files can be attached in 3 different levels: Interchange In, Document or Interchange Out depending on where in the flow the files are generated. These files helps us in debug purpose or extra logging as well, so we may use it for further investigation in case if any document failed.
Existing Usage
At the moment it is used from AS4 for additional info, and from PGP component to save file in decrypted stage
Content on this page: