Distribution Search Details
The distribution details page contains all the information related to a single distribution. Depending on the number of distributions selected in the list, tabs may be shown at the top of the page, which will allow you to quickly switch between each distribution.
When creating new distributions, this page layout will also be used to input data.
Note that configuration keys play a big role in understanding and configuring distributions, so we encourage you to read the Reusability - Configuration keys chapter.
As the Distribution Search Details page contains a lot of elements, we will go through the individual sections one by one, starting from the top of the page.
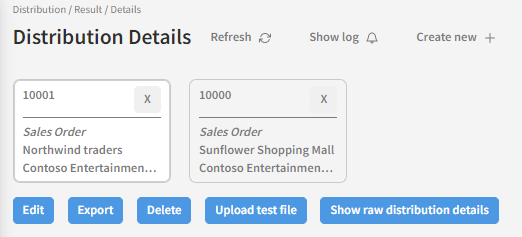
In this example, we have chosen two distributions, so a tab is created for each. You can easily switch between them by clicking on the corresponding tab.
When you select a tab, all actions taken on the page will only be performed on the selected distribution.
Header Actions
On the very top of the screen you can see three options: "Refresh", "Show log" and "Create new". We will go through these now.
Refresh
Clicking this will refresh all data in the currently opened distribution.
Show log
Press this to be shown a pop-up of the distribution log. This will contain all the actions that have been performed on the distribution. See the 'Show Log' page in the user guide for more information about the different columns.
Create new
Click this if you want to create a new distribution. You will be redirected to the 'Create New Distribution' page. Creating distributions is explained on a separate page in the user guide.
Action Buttons
The blue buttons perform various actions on the distribution. They will be explained in detail below.
Edit
When you first open the Distribution Search Details page, the fields will be locked for editing. Clicking this button will allow you to edit the distribution data. What each field does will be described in its own section on this page. Press the 'Save' button that has now replaced the 'Edit' button to save your changes, or press 'Cancel' to cancel your changes.
Export
Clicking this will export the raw distribution data in XML format. You can read more about this in the Import and export of configuration chapter.
Delete
Press this to delete the distribution. A pop-up asking whether you are sure about the deletion will be shown first. Note that deleting a distribution is irreversible.
Upload test file
This allows you to upload a file directly into Link without going through the normal inbound location. When you press the button, a pop-up allowing you to choose a local file will be shown. After selecting a document, some information about the document will be visible as shown in the screenshot below.
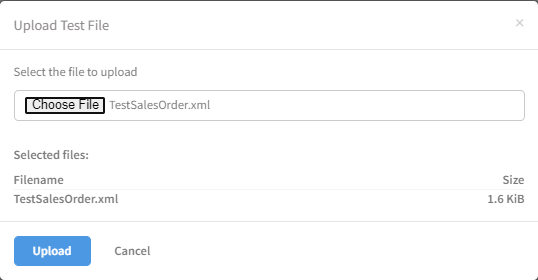
It is also possible to upload multiple files at once. To do this, simply select all the files you want uploaded in the File explorer. Each file to be uploaded will be shown under "Selected files".
When you are done selecting files, press 'Upload' , where after you will be redirected to the Document detail page for the uploaded files.
Show raw distribution details
Click this to see all technical details relating to the distribution. This is an advanced topic primarily used by developers and will not be explained further here.
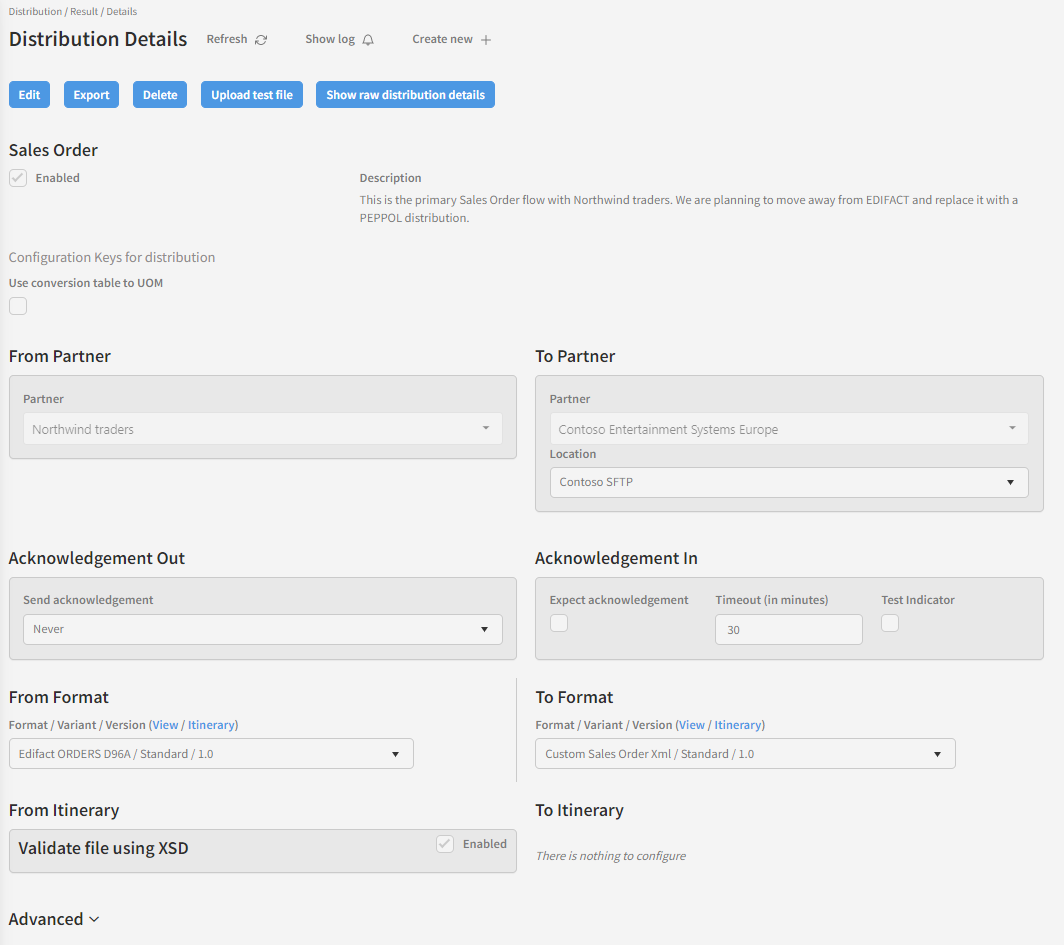
Enabling and description

Note that a distribution is not active before you have ticked the "Enabled" checkbox.
The description field is optional - if you like, you can use it to input a text section containing any comments, you'd like to enter.
Configuration keys on distributions
This section would quite often be empty, but In this example, we have a configuration key implemented to be available for distributions. It's called "Use conversion table to UOM" (Unit Of Measure) and it's aim is to increase the reusability of the mappings.

Configuration keys in general is a large topic that we recommend reading more about in the Reusability - Conversion tables article. We will not dive deeper into it her.
From Partner/To Partner

This section contains configuration about the partners associated with the distribution, as well as the outbound location.
Use the partner fields to view or change who are sending and receiving documents related to this distribution.
In the "location" dropdown, you can select between all locations that exists on the selected partner and it's also possible to select a global location. You can read more about this in the Outgoing locations chapter.
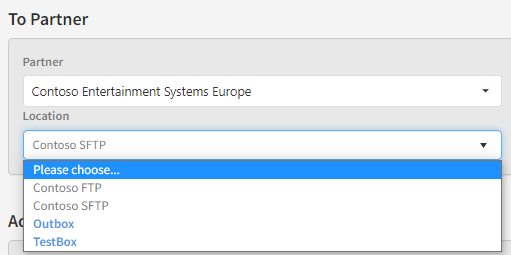
Note that global locations are written in blue and bold text, while locations associated with the partner are not.
Note also that you can't change the location back from Outbox if there are documents related to the same distribution in the system which have the status "Outbox".
Acknowledgement Out/In
Next section is about acknowledgement files. In some scenarios, the receiver of a document is expected to return another document as a technical receipt/confirmation that the main document has been received. Link is capable both of sending acknowledgement messages as well as making sure that a document is not set to completed status unless an eventually required acknowledgement message was received.

Acknowledgement Out
The options here are related to the From partner. You have three options for this parameter.
-
"Never" means that Link will not return an acknowledgement message to the sender
-
"On request" means that Link will only send an acknowledgement if the incoming file contains an indicator that this is expected. E.g. EDIFACT supports this indication while other data for
-
"Always" means that Link will always create an acknowledgement message when receiving documents belonging to the (active) distribution.
Acknowledgement In
The options here are related to the To partner. If you want to receive an acknowledgement message from the document receiver before a document is considered to be completed, you should tick the ‘Expect acknowledgement’ checkbox. Doing so will cause all documents in this distribution to get the status ‘Awaiting acknowledgment’ instead of ‘Complete’ when the document has been delivered. When the acknowledgement message has been received, the document will then change to ‘Complete’ status.
You can set timeout (in minutes) for the acknowledgement message in the ‘Timeout’ field.
You can flag all outgoing messages as test messages by ticking the ‘Test indicator’ checkbox. This is useful when you want to test your distributions before you take them to production.
From Format/To Format
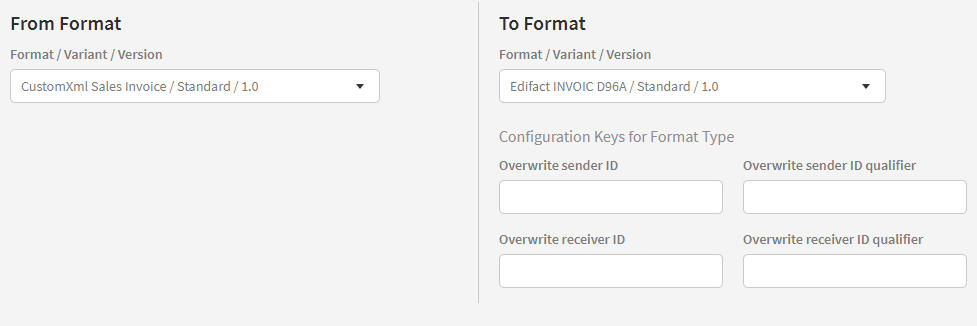
The format section contains information about the sending and receiving format. Here you can specify the exact format/variant/version of both the incoming and the outgoing message.
Configuration Keys for Format Type
As on the distribution level, you might see configuration key entries on the format level - as in this example, where four configuration keys have been implemented for the EDIFACT format type.
Itinerary parameters

Another advanced concept is that Link makes it possible to configure parameters defined on itineraries on distributions. In this example, it's possible to choose if schema-validation should be performed or not on incoming files.
If no itinerary parameters are present for a section, you will just see the text "There is nothing to configure" and not have any options.
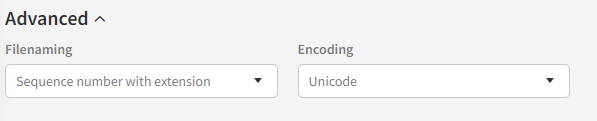
Advanced
Under the "Advanced" headline you might find even more settings for a distribution. In this example, two file-naming parameters have been enabled for the selected format ensuring that it's possible to control the output filename and encoding. To read more about all the advanced configuration options, we advice to read the Developer guide.
Choose duplicate check types
See the 'Duplicate Check' page in the user guide for more information.
Content on this page: